ACParadise Network:
American Cosplay Paradise
American Cosplay Experience
American Cosplay Snapshots
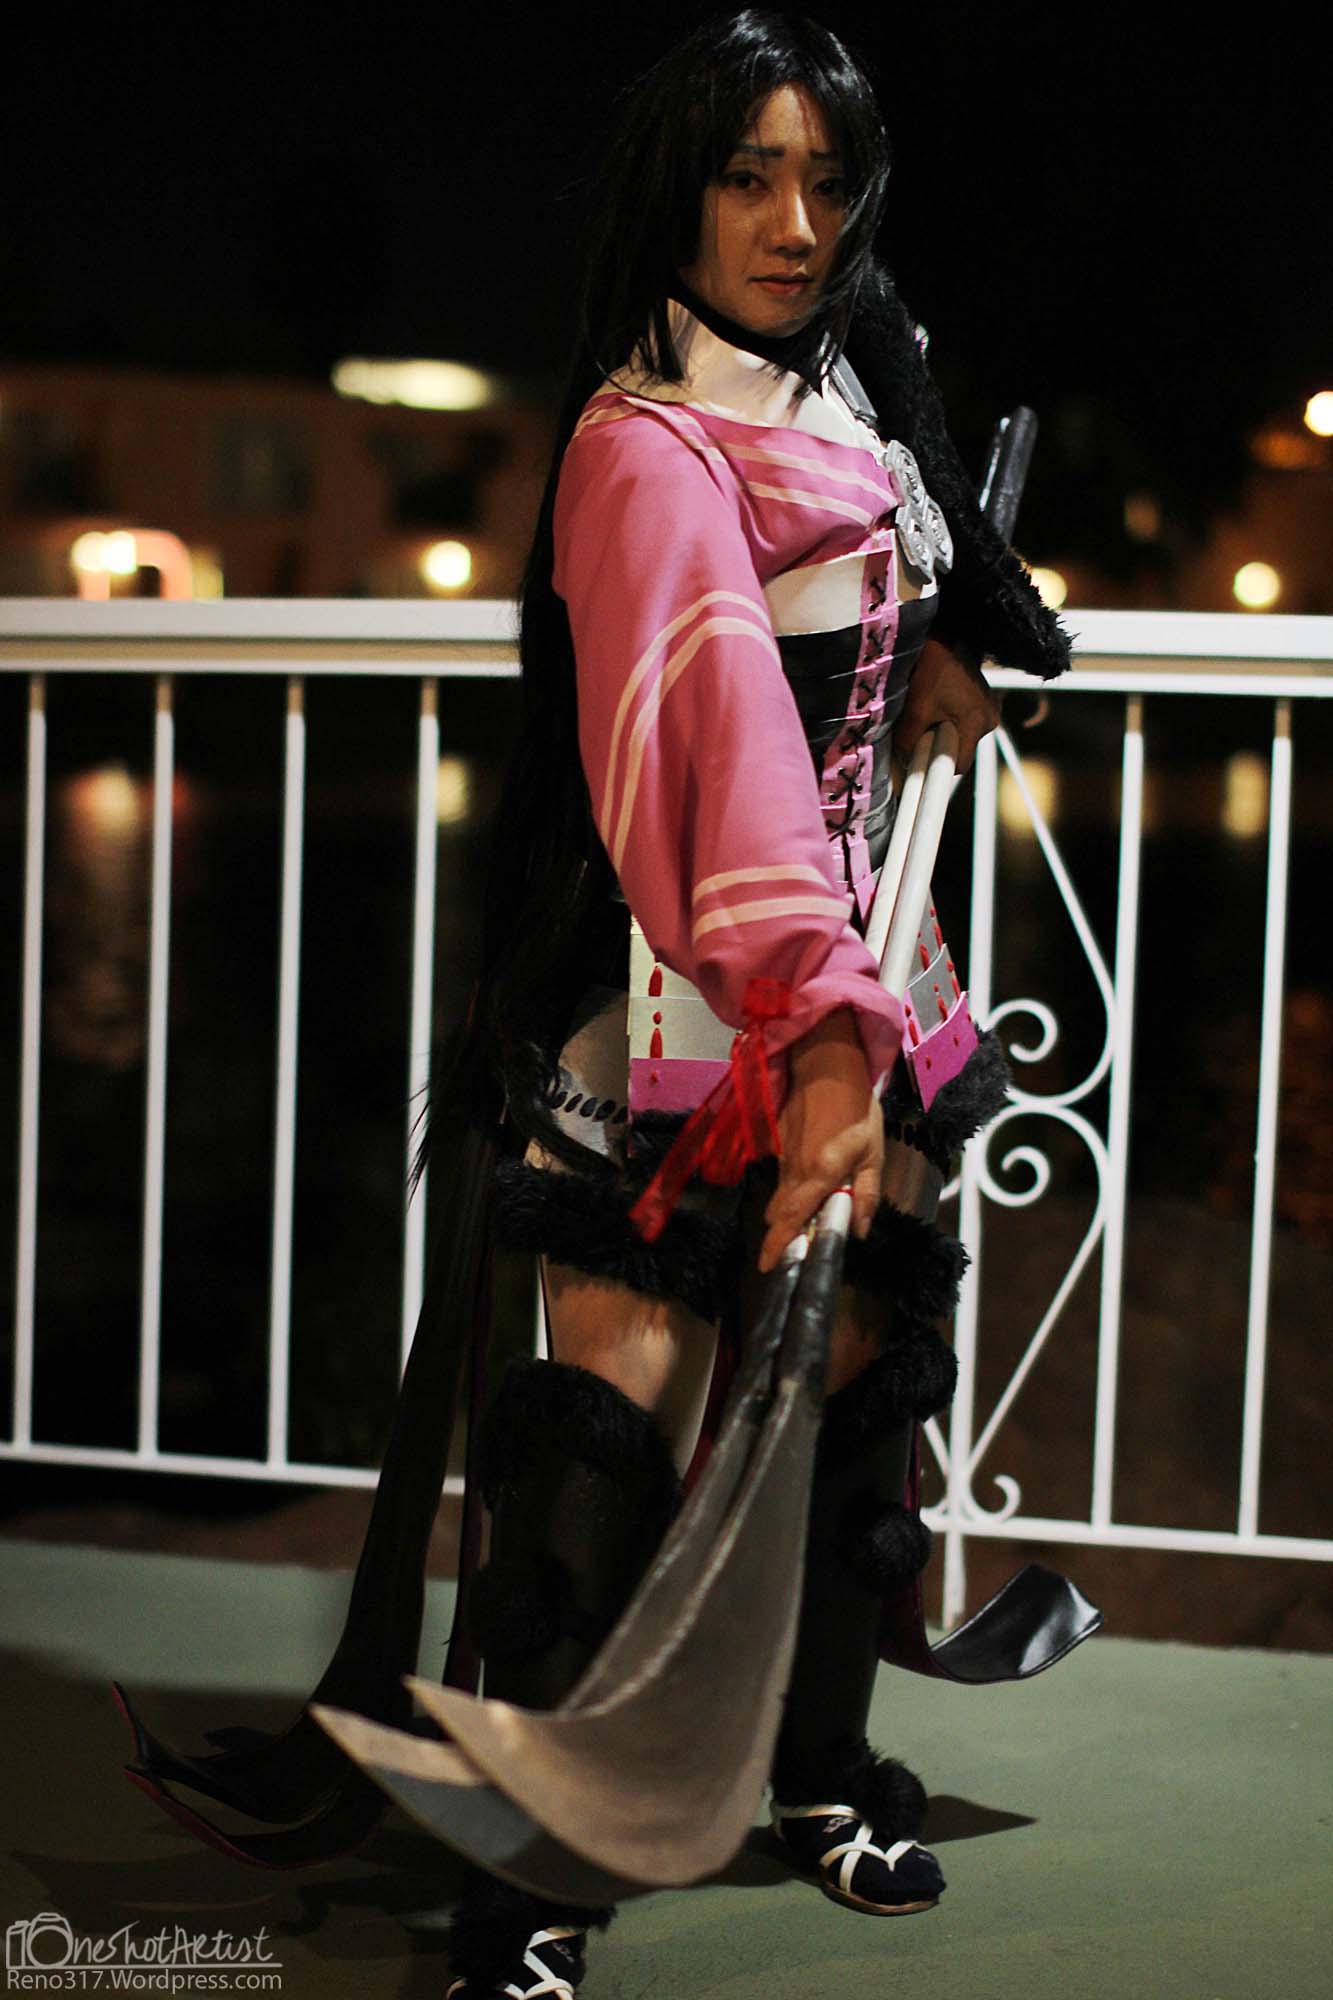
Cosplayer manik_semiramis > Costume of Oichi (Sengoku Basara)
- Most Recent Photo
- 05-28-2013
- Series
- Sengoku Basara
- Character
- Oichi
- Year Completed:
- 2012
- Construction Difficulty:
- Normal
- Awards
- DaiCon 2012 Best Costume (ist version of Oichi - the armor bodice was actually just a plain vinyl bodice @ this point)
- Costume worn at:
- Anime Expo 2012
About this Costume
- Construction Details:
-
Ok...Oichi's cosplay breakdown? If you really wanna know:
Update as of Norcal Gathering 2012~ Painted Oichi's pink sleeve/shirt, added the final two tails, and used much thicker craft foam for her shoulder guard~
The black turtleneck I'm wearing was purchased (I know she looks like she has a fur collar - I made one, but didn't wear it because summer = heat. UGH). The underkimono was constructed out of cotton with a satin edging, the pink....half shirt/sleeve was a polyester fabric that was the shade of pink I was looking for (still unpainted without the stripes).
Her armor bodice - I created a frame by using duct tape and a tank top I no longer used, cut up the tank top to get the parallel lines in 1.5 inch widths, then added about half an inch to the top to account for overlapping "plates" when I put each section onto the craft foam. Enter the craft foam/glue process and backed with cotton gauze, then painted with acrylic+fabric paint to get the black, Rub n' Buff for the silver sections. The pink strip along the black started out as fabric, which I didn't like, so I tried paint, which was worse IMO, so I'm going to switch it back to the same fabric as the sleeve. Each eyelet is about .75" apart, and I think I have a total of 14 on there (which I'm pretty sure is how many Oichi has - she has like, 7 X's?) The bodice was laced so the laces made the "X" marks along the front.
Armor: All of it's made of either craft foam or Styrene, and either edged or lined with synthetic fur
Craftfoam (glue cured and backed with cotton gauze) with painted black acrylic/fabric glue: arm guard, Sode, shinguards.
The Sode, just as an FYI, worked best when attached to a snap on my bra-strap. >_>
Styrene painted with spray paint: Armor skirt and center panel- each 6"x3" panel was drilled and laced, and is actually held together by the lacing. The pink panels have the same fabric as the pink half-shirt glued onto the styrene, also drilled and laced, and backed with synthetic fur.
Thigh guards were also drilled and laced, and a hairband with the "non-slip" elastic was used (but since it kept slipping, I actually used a garter to hold them up). The pompoms were made by hand with the synthetic fur and stuffing from an old pillow.
Her "tails" are black vinyl on the top, and the fabric in a few shades darker than her pink shirt, with metal boning inside it to hold the shape and interfacing to keep the width. Shoes were sandals I happened to find and attached a pom pom to it, and I purchased her socks. :3
The Azai Crest: At Daicon, it was made of craft foam, backed by plastic, and the raised edges were made of hot glue. The paint was Rub n Buff, and I outlined it with black to make the raised edges more prominent. Later, for Fanime 2012 and Anime Expo, I made the current Azai Seal out of sculpey, painted with Rub n Buff. Basically, there is a center pin backing in the center of the seal, and I added other pin backings at the top and left sections (top to hold the pin in the right position, left to hold the red cord.
Naginata: It's two long rods (I think 6ft)with the blades attached to them and they connect together by velcro and magnets. The blade parts have a foamboard base on styrene with wonderflex covering it, modge podged and painted with silver and black rub n buff, with more silver at the "sharper" edges to give it the sharpened look. X3 One of my first props!
BTW the difficulty level below? I'm not the best person to ask. :3 But I think she's one of my most complex cosplays at this time~ - Personal Thoughts:
- Oichi was given to me as a challenge by a friend, and it seems every time I think she's finished, there's something else I want to change~
Wig Details
- Wig Brand
- Cosplay-Wig
- Wig Name
- 44" Super Long
- Original Color:
- Black
- Styling Time
- 30min to an hour
- Wig Quality Rating
- 4 / 5.00
- Styling Notes
- I actually used the rolls from the paper towels to create the curve for Oichi's bangs, but ended up with too much curve. :3 I trimmed the bangs and rolled them onto the paper towels, hair sprayed them, then after they dried, ironed them to a more gentle curve with a flat iron. I did this for each section of her bangs (she has three layers along the front of her face).
- Wig Review
- Super tangly right now, but I need to get better at managing my wigs. And it's the most tangly where the wig meets the sode. :/
Add a Comment


 Upgrade Cosplayer
Sorry, you must be a registered user of and logged in to view and add comments. Either log in or register now!