ACParadise Network:
American Cosplay Paradise
American Cosplay Experience
American Cosplay Snapshots
Cosplayer Alasse Veneanar > Costume of Yue (Cardcaptor Sakura)
- Most Recent Photo
- 01-18-2015
- Series
- Cardcaptor Sakura
- Character
- Yue
- Special Variation:
- Manga Version
- Year Completed:
- N/A
- Construction Difficulty:
- Very Difficult
About this Costume
- Construction Details:
-
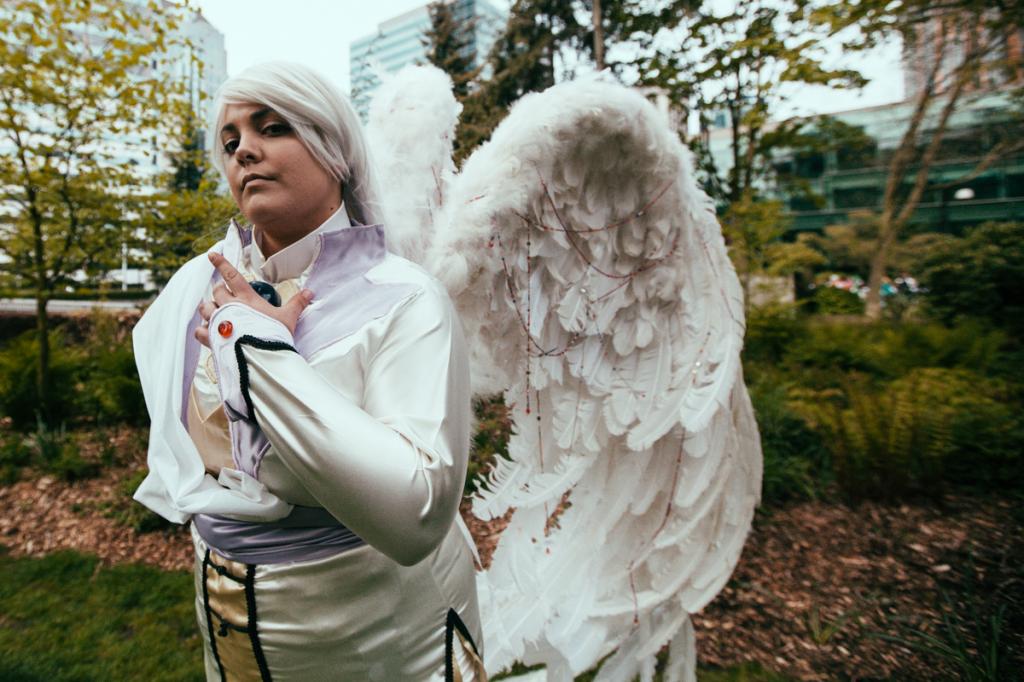
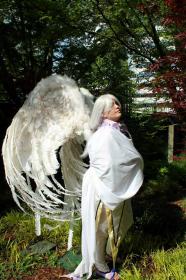
WINGS/BACKPLATE
Oh my god the wings.....
I researched these for a good year before finally deciding one what the hell I was going to do. Originally I was going to buy pre-made wings from a seller, but they were going to cost around $500 dollars. Something which I just did not have. I eventually found someone that had made their own wings and even had a tutorial on HOW they made them!
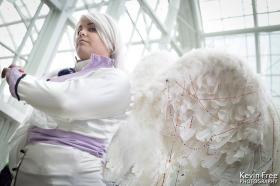
The “skeleton” of the wings are PVC pipe set in the basic shape I wanted, I then wrapped some muslin around the top half where the “meat” of the wing would be so it could catch and hold the foam I was going to use.
The foam is a special expanding foam that starts out as liquid and, when mixed together with an a&b mixture causes it to heat and expand. It is called Polyurethane Foam, it can be bought at Tap Plastics or from other manufacturing sites. I'd suggest buying it from US Composites as it is FAR cheaper... especially if you are needing to use it on such a huge project. But be warned, a little bit goes a LONG way.
Anyway, once I had it in place and the general shape I let it dry and then was able to carve into it to refine the shape of the wing a bit more before adding the feathers.
Now the feathers were another problem as pretty much no one sells feathers—anywhere... and if they do it costs an arm and a leg to buy them. JUST the feathers alone cost over $100 dollars, and all I bought was a two different sizes in a pound each.
The large feathers were male turkey wing rounds in equal parts left and right—which is very important to get as, obviously both wings are not curved the same direction. The smaller feathers I decided to go with were the flats of the turkey feathers, they are half fluff and half flat, squared feather. It's important not get all the same type of feather for wings, as normal bird wind are not made of all one length and type, there are several different types of feathers on a real wing. I also got lucky and had about a half pound of even smaller, solid round feathers, as well as the larger trimmed ones from a previous set of pre-made wings I had bought when I first cosplayed Yue, which I ripped apart and recycled for these new ones.
Now, even though the feathers I bought were long, they were not long enough on their own so I had to find a way to fix that. I took 2-4 feathers, depending on how big I wanted them) and cut off the “stem” (the part used as the quill for writing utensils) as well as the rounded tip so it would blend better with the next feather then laid them over one another, gluing each piece together. I got the idea to lengthen them from the site I found the tutorial on. So, no I did not get those giant feathers from mutated monster bird.
When I began attaching them, I did the insides of the wings and I filled in the middle area first, which was a mistake, I should have started from the bottom and worked my way up, oh well. I used the cheep feathers from the first set of wings to “cover” most of the meat, so I didn't have to waste the newer, nicer ones. I then proceeded to cover all those with the smaller fluffier and round feathers. At the bottom I had to hammer holes into the foam with an awl and then shove the larger feathers into the holes so it looked like a seamless transition instead of several uneven layers.
The tops of the wings were covered in the fluffier feathers layered over one another from the back (where the wings would flare out) to the front and base where they meet my back.
After I was finished, I decided they were too plain so I added strands of beads that I hand-strung myself, in the colors of the gems on the rest of the outfit.
The back plate—which is going to get remade—was originally made from a 7x8ish inch metal plate which has a flag pole post drilled and screwed into it, to hold the 'Y' base for the wings in place. I did it this way, so that the entire stricture can be removed in pieces. The wings are set into the 'Y' individually and are pinned in place. The 'Y' itself is then removable from the pole base and is also pinned in place with the pin that came with the pole base. That way I can put the plat and pole base on underneath my clothing and then attach everything on afterward without damaging the wings. Also, should I need to get them off in a hurry or for sitting, etc. they can be removed and I can still be in costume as my wig covers the base.
I will soon be remaking the back plate from a very thick plexiglass that is far lighter and larger to fit to the shape of my back better. The metal plate was far too heavy and small for the straps and began to sag away from my back after only an hour or so. Something which, when added with 6 foot long wings sticking straight out of my back did not mix well and ended up feeling like they each weight 100 pounds by the end of the day, even though each wing only weighs about 15 pounds.
I'm not even going to get into the straps and how I attached them, but they are wrapped around not only shoulders, but my waist, and legs and all have snaps for easy removal.
EARCUFF
The ear cuff is made from silver fimo clay, but I still painted over with silver paint as I had to sand and glue all over the place to keep the edging together as well as the resin gems in place. I originally made it with an earring stem inside to better keep it in place on my ear, but when I went to put it on, it was too difficult to do, so I just used spirit gum to keep it in place. I may try to attempt the earring stem thing again, last time I was too impatient to fuss around with it.
SHOULDER WRAP
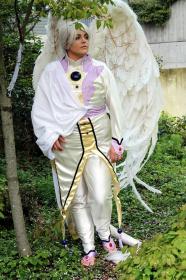
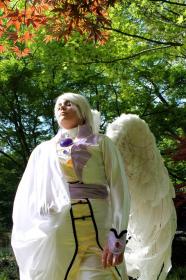
I wanted something that was sturdy enough to stand up to being dragged through the dirt while being light and flowy enough that it would still catch the wind. I ended up using a plain old, very thin cotton material... but of course that wasn't good enough for me, (BECAUSE it was so plain) so I added some simple embroidery and beading at the bottom edge. The embroidered design is a cherry blossom branch and I just hand-sewed clear glass beads randomly throughout.
GEMS
All the gems, including the giant blue gem on the chest are cast in resin. I had to re-cast them twice as the first set didn't mix with the color properly, I had to recast the giant gem on the chest 3 times because it wasn't drying as it is so large. I attempted to hollow out part of it, but couldn't do that without compromising the color and shape, so it is solid all the way through and about half the size of a softball, so it is very heavy.
In order to adjust for that weight, I had to line the back of it with very thick stabilizer that spread out into the fabric surrounding it, as well as doubling up the fabric itself to keep everything in place and from sagging. Which actually worked... shockingly enough.
TASSELS
I got super lucky with these and happened to find the “balls” in my garage when I was cleaning it one day. They are just wooden craft balls and as they were the perfect shape and super light, I decided to use them. All I had to do was drill holes through them so I could attach them to the top and string the tassels through them.
I was originally going to cast resin molds of them so the color would match the other gems, but I wasn't sure how to do this and make perfectly circular orb. When I found these I thought trying to match the color was a minor compromise and I sat for about an hour matching the paints to the resin gems cast before I managed to find something that matches almost perfectly. I then covered them in several layers of shiny gloss to achieve the same shine as the gems and I was good.
The tassels are 3 different colors of embroidery floss completely pulled apart (a task which I put to my grandmother at the time as it was so frustrating and time consuming) and then combed through to blend together nicely; I didn't like the color that is in the original design and it didn't translate over into RL very well, so I made them more the color of the light purple on the outfit. It makes them stand out better as well. I also hid a very small bell inside each tassel so I make a bit a noise when I walk, something ethereal and otherworldly, as Yue is.
OUTFIT
I decided to go with a satin—even though I know it does not photograph well sometimes—for the main body of the outfit as well as the pants. The lavender and yellow fabrics are satin as well, though the lavender is more matte than shiny
I had to get those two colors as well as the black trim down in the Fashion District in LA since I could find nothing at Joann's that matched what I wanted. Since I was making the manga version, the colors had to be softer, something which was almost impossible to find at a store.
The trim is a Chinese weave which I thought was perfect for him and added a bit more depth and detail to the costume. I made the Chinese knots for the front myself and they are workable, though the front is sewn together as one whole piece instead of an overcoat like it should be.
The lavender around the chest and neck area is glued on, but I may go back and applique around the edges to give it a more finished look and keep it in place better, later.
- Personal Thoughts:
- Yue has always been a dream cosplay of mine. From the moment I learned of cosplaying. He was my first cosplay worn and first cosplay made by me and I try to improve upon him every time I wear him. I've gone from commissioning/pre-made parts, to making him entirely on my own, wig, wings and all and he has definitely been a journey and learning experience. He taught me a LOT of what I know about sewing and crafting today.
Wig Details
- Wig Review
- I still have not figured out a way to keep it from knotting and tangling at the base of the Delilah where it comes together at the bottom.... but it is a major problem that seems would only be fixed with someone holding the wig all the way away from my body at all times except for pics. So, if you ever have to make a wig that way, be prepared.
Add a Comment




 Upgrade Cosplayer
Sorry, you must be a registered user of and logged in to view and add comments. Either log in or register now!