ACParadise Network:
American Cosplay Paradise
American Cosplay Experience
American Cosplay Snapshots
Cosplayer Holly Gloha > Costume of Weiss Schnee (RWBY)
- Most Recent Photo
- 07-27-2014
- Series
- RWBY
- Character
- Weiss Schnee
- Year Completed:
- 2014
- Construction Difficulty:
About this Costume
- Construction Details:
-
Weiss Costume: From the bottom down:
The boots were purchased online, and I had to pop off the top band around the knee and hand curl and stitch the V shape into the boot. Once that was done, I spray painted the boots with two different cans of Rustoleum Painter's Pro for Vinyl cans to get the gradient look. I had the toe covered in painters tape, and after the paint had dried, I peeled that off, hot glued on the silver rope trim and hot glued white vinyl in the diamond areas.
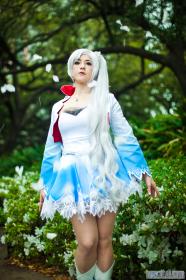
The skirt was made with high quality white bridal satin using the Green Pepper Ice Skaters Pattern (http://butterick.mccall.com/filebin/images/product_images/Full/GPF813.jpg ). I sketched out the scallop design, then used a solder tool on the edges-it cauterized the edges so I didn't have to do a hem on them. Following a FABULOUS tip I saw on God Save the Queen Fashions Facebook, I proceeded to gradient dye the fabric. In a spray bottle, mix a light colored fabric paint with water (you'll have to experiment to get the right viscosity). Spray that onto WET fabric-the paint will spread beautifully giving a wonderful Dip Dye Look. Let that hang dry for 3 days, then repeat the process with a darker fabric dye. Best. Tip. EVER!!! Once it was done, I stitched on the white chiffon layer and proceeded to hand paint on the lace design using fabric puff paint. (I drew out the design of the lace to scale-to paint it on, I had the paper on the bottom, wax paper on top, then pinned the chiffon on top of the wax paper and traced the design with the paint.) Once it was properly dried, I used to solder tool to cauterize the ends. I finished the hems with a folded hem (I was going for Craftsmanship on this one). I hand stitched on a silver trim layer between the fabric and chiffon to give just bit of pop.
The corset is actually a bunnysuit pattern I bought off of Nerdbroidery on Etsy (http://www.etsy.com/shop/Nerdbroidery ), but the patterns are usually Limited Edition, so when she sells them, BUY THEM! Using high quality white bridal satin, I followed the instructions to the letter and got a gorgeous, form fitting steel boned corset that i adore! I did add on the belt, and top stitched it on half of the corset, the other half hangs free so I can use the zipper in the back. I attach the belt in the front with some snaps, so I can dress myself without my belt looking derpy. The black part is three layers of chiffon-the largest layer is scalloped with dots, the second medium layer is scalloped,and the third, front layer is just one semi-circle. All three were cut out with the solder tool.
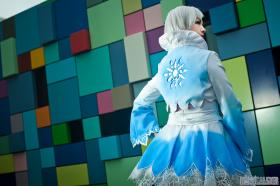
The jacket is a heavily modified Simplicity pattern #3775 (https://lh4.googleusercontent.com/-8DOz7PNnIvs/TXLyyJ_NhWI/AAAAAAAAApA/IT_j6XsZl1o/s1600/Simp+3775+pattern+front.jpg ) Figure F. I made a mockup out of muslin to draft where the scalloping would go, design the bell sleeves and scalloping, and draft how much fabric I would need for the white edging on the sleeves. So. Much. Drafting! The snowflake design was modified a bit, then cut out with the solder tool, (as was the sleeve cutouts) then the back pattern and sleeves were spray dyed in the same fashion as the skirt. I used two layers of white fabric for the outside, and one layer of red satin for the inside lining. The collar was free drafted, pleated and had heavy interfacing inside to give it some rigidity. The inside hem of the sleeves were exposed, so I did an enclosed hem with bias tape. Again, I handstitched on silver trim for detailing.
The wig was bought online, and was one of the few that came with the little bun. I bought a tiara from Sam Moon Trading company and modified it a bit to fit around the detatchable ponytail clip
- Personal Thoughts:
- I WORE THE PONYTAIL ON THE WRONG SIDE FOR THESE SHOTS! ARGH!
Add a Comment














Sorry, you must be a registered user of and logged in to view and add comments. Either log in or register now!