ACParadise Network:
American Cosplay Paradise
American Cosplay Experience
American Cosplay Snapshots
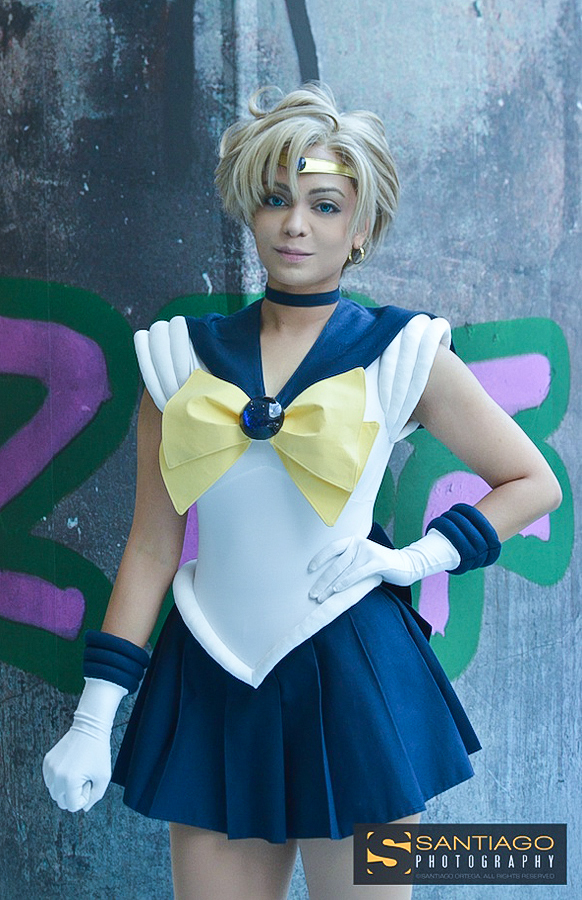
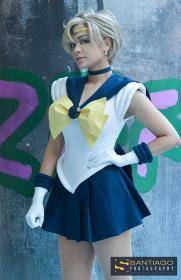
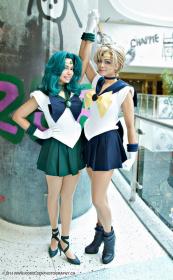
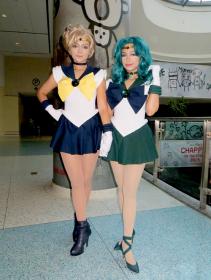
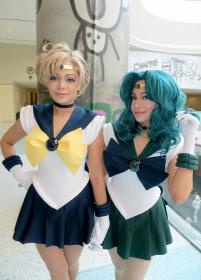
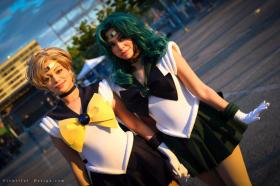
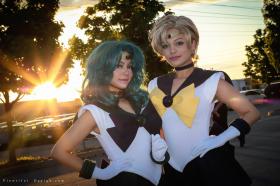
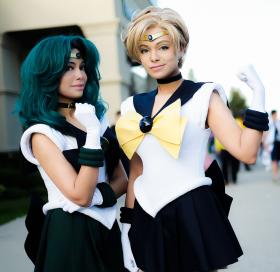
Cosplayer Glay > Costume of Sailor Uranus (Sailor Moon)
- Most Recent Photo
- 11-07-2014
- Series
- Sailor Moon
- Character
- Sailor Uranus
- Year Completed:
- 2014
- Construction Difficulty:
- Normal
- Costume worn at:
- Anime North 2014
About this Costume
- Construction Details:
-
Contacts: I used 'splash of colour' contacts in aqua from clearlycontacts.com because my Neptune was using those and she had extra ones and they turned out looking good!
Dance tights: capezio brand
Earring: one of my old Buu saga Bulma earrings which I’d gotten from Claire’s ages ago
Tiara: bought the brass one without a gem from catzia for my sailor moon cosplay so my sis popped off the foam moon I’d glued on and shined it up using ketchup... apparently that’s a thing lol! She replaced the moon with a resin gem she cast. The back of the gem was painted with the same colours and style as the bow gem. The tiara really hurts after a bit of wear and last time we had headaches and bruises >_< so my sis cut the elastic open and tied ribbon on each end so there’s still give in the front but not all the way around.
Fabric Choice: 6 med size snaps, 1 small snap, 2 hook n bars, 1 bag polyfill, small piece of Velcro, 100% cotton in yellow and sea green (QD custom dyed hers), cotton poplin, white matte spandex, heavy fusible interfacing. Ideally I wanted 100% cotton for Uranus to match Neptune’s, but couldn’t find any in the right colour and I didn’t want to dye my fabric so I just got the poplin. It’s much thinner than Neptune’s cotton but whatever lol. I also bought navy blue garment leather for the boots and tbh the dude at the fabric store gave me this look of ‘wtf you can’t do that’ when I said I was refurbishing boots and I still remember it even now and I’m burning with anger at your condescending incredulity you piece of crap please think outside the box and don’t underestimate the power of glue.
Anyway...
Choker: a strip of navy blue fabric cut on the BIAS and sewn by my sis, closes with 1 small snap cuz I hate hook n eyes.
Bows: Neptune’s bows are all the same colour as Uranus’ navy blue, so I used my poplin to make 3 blue bows and 1 yellow bow (I found 100% cotton in yellow). Each bow is made of two pieces, a top half (the main bow part) and a bottom half (the tails). Both were relatively the same size, though the bottom half was made a little bit longer so when I bent them the tails would stick out a bit further than the top, and each piece had allowance in the middle for the tie that’ll go around it or the gem. This is too hard to explain, just google fake bow tutorials and you can kinda see what I’m talking about.
Sooo okay, so each bow had 4 pieces of fabric in total, 2 for the bow top and 2 for the tails. I interfaced one piece for the bow top and one for the tails with the heavy fusible interfacing then went to the machine and sewed the interfaced pieces to the non interfaced pieces all the way around the edge. The interfaced side will be the good side of the bow, so I cut a slit in the back of the bow (the non-interfaced fabric side) in the middle VERTICALLY so the fabric doesn’t rip sideways and ruin the entire back of the bow. Used this slit to turn the pieces rightside out (kinda frustrating and got crunched up) then hit the ironing board. Once they were all crisp and right side out I went and put top stitching around the edges. Not necessary but I liked how it looked.
Okay, then I folded the bow top by pinching it in the middle and handsewing in the crease I liked. The handsewing was sorta messy and a pain since that’s a lot of interfacing I sewed through but it won’t matter cuz it’s covered with a strip of fabric anyway. I did the same for the tails part of the bow, and then hand sewed them together. I took a rectangle strip of my fabric, ironed it into the right width, top stitched and then wrapped it around the middle to cover all the messy handsewing. It was closed in the back by handsewing. For the front bow, I sewed a piece of Velcro for the gem onto the rectangle strip before I wrapped it around the bow and closed it. I also added some hand tacks to attach the top of the bows to the tails in the position I wanted so they wouldn’t wave around. Not necessary but I rather have the bows like pieces of armor I can just snap on and forget about. (2 snaps for front bow, 2 snaps for back bow, though last time I just hand stitched the back bow on, this time I went for snaps so I wouldn’t crunch it while putting on the fuku).
Bow Gem: cast by my sister, she used Easycast clear resin and then painted the back with nailpolish n stuff. QD made the gem for her own bow as well. Both were backed with a piece of thin fabric (I think) and then Velcro (matching to the front bow piece) was hotglued onto the back of the gem so it can attach to the front bow and come off for storage/transportation. I don’t recommend using Velcro on spandex EVER, so this is the only place I used Velcro on because the gem back needs to stay flat and it attached to the bow, so there is zero contact with spandex in this exchange. Alternately could have just hotglued the gem to the bow ala our last fukus, but this way we don’t clunk our faces on the gem as we’re putting the collars on.
Sailor collar: I drafted a pattern that fit us. The collar doesn’t attach to the fuku in any way so it’s very simple, just two pieces of fabric sewn together in the shape leaving the very back of the neck open so I could turn them inside out, press then top stitch it closed and all around the edges. It’d be a bit more difficult if we were adding white stripes, in which case I’d just top stitch the ribbon to one side before sewing the two pieces together. I interfaced my collar with medium weight fusible just cuz the poplin is way lighter than Neptune’s cotton and the collar should be fairly sturdy to sit on the shoulders nicely. I hand sewed the points of the front of the collar together making sure I could get my head through it. Then hand sewed the point of the collar to the back of the front bow so it became one piece. When I put the collar on over my head the bow is attached and hangs off. I sewed 2 snaps onto the back of the middle of the front bow which snap to the fuku neckline.
Gloves: QD sewed the gloves. She made a tracing of our hand onto cardboard as a pattern and cut out two pieces of the spandex (no thumb piece to this glove, just two halves sewn together). She used stretch stitch to sew them together and worked some magic so we had gloves. I patterned the roll tops, which was basically rectangles cut on the BIAS with a fold at the top and then each roll segment was created by top stitching a line to create 3 channels. We stuffed them with polyfill and then closed it up via machine making sure it went up our arms to the right height. The roll pieces were then hand stitched to the ends of the gloves.
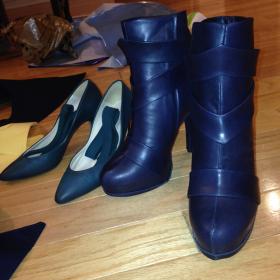
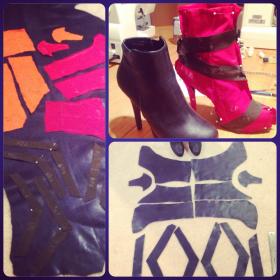
Boots: Alright so I started with some booties I’d gotten at Le Chateau like a year and a half ago with the intention of using them for Uranus. I managed to work them in some so they’re comfy now as opposed to using new shoes. I try to use vintage or old shoes I don’t want anymore for cosplay stuff if I can because of all the walking involved at cons it’s better with worked in shoes lmao. These are permanent boot covers btw.
Okay so the booties had some buckles on them that I cut off, and then I sanded the entire shoe so that it would take glue easier. I then grabbed some old broadcloth and started patterning my shoe cover. I made a middle seam since the leather I got would definitely not stretch across the severe angle of the bootie (they had a 1 inch platform and the shoes are approx 4 inch high. I’m about 2 inches taller than my sis whose heels are about 3 inches, so altogether I get approx 3 inches on her to try and create Ura and Nep’s height diff). Anyway, I traced the shoe, made the middle seam, and used pins to hold the fabric to the shoe and cut out the pattern. I gave a bit extra around the sole since I needed room to grab and pull to make sure it’s tight as possible and also just for error’s sake. I patterned the strap things too, using the pointed look (sometimes it looks pointy sometimes just like normal bands). The pattern for those looked like wide Vs. The heels had separate pattern pieces.
I took my pieces to the leather and cut out my shapes, leaving about 4 inches excess for the top hem since my original booties were too short and I wanted to make them 2inches higher. This excess was so I could fold the leather over and glue the top hem.
The first thing to do was to iron my leather (on the wrong side) to get all the creases out. Also hot leather is way easier to mold and stuff so before I sew it I run an iron over it. Then I took the heel leather pieces and covered the heels first, which was easily done by smearing hot glue along the boot heel and then pressing and wrapping the heel leather piece around it. I tried to keep everything neat. There was some unevenness of the glue cuz I wasn’t watching what I was doing (as usual) so I took the shoes to my ironing board, covered the leather with some broad cloth, and ironed it. Then I smoothed the heated leather into the right place. (I use hot glue just cuz it loves the bad side of leather and can be rubbed off the good side, and also I’m afraid of using anything stronger in case I make a mistake and fumes lol). I trimmed the excess leather along the top of the heel with an exacto knife careful to not slice up the original shoe. Heels done. Cutting leather is kinda tedious since it can look choppy and rough depending but I patterned this to be covered so no worries.
What came next was a nightmarish episode of sewing in the middle seam of the bootie and then using pins sparingly to stretch and fit the pattern over the shoe. I top stitched the inseam of the shoe that lies just over top the zipper of the original boot so that it would cover it, but also kind of look like it belonged on the shoe. I’ve found shoes look more ‘natural/normal’ if there are some top stitching details on there since regular everyday stuff has it as well. Personal choice. I left the leather pinned on the shoe for a while so it could conform to the shape and then I came back and used simple hot glue to attached it. I just glued around the edges of the sole and along the zipper. Then I used an exacto knife and cleaned up the excess leather along the sole. It looked raw and choppy like the heel.
The next thing to do was the straps. I used a thicker grade leather I had lying around from my thor exploits as the structure for each strap and covered them by gluing on the navy garment leather and folding over the edges then gluing those down. I then took the front toe straps and glued them to the shoe then cut off the excess. The top bands I sewed and glued together and they are not attached to the boot since I need the zipper to be functional. So I slip this bands on my foot first, then the shoe, then push them down into place afterwards.
At this point, I folded over and glued down the hem of the boot to the height I wanted. I decided I wanted to be more accurate and took this opportunity to paint the bottom of my shoe a tan colour. Then as that dried, I went to my leftover leather and cut long strips (sized to the circumference of the shoe’s sole) and folded then top stitched it into a sort of bias tape about ½ cm in width. This was my edging trim to ‘finish’ the shoe. I cut it close to the stitching so it was even and straight, then glued the trim around all the raw edging starting in the back of the heel and ending there. I installed a hook n bar at the top of the zipper on each shoe (reinforced my hand stitching with glue) andddd done!
Skirt: okay I’ll preface this by saying I should have really tripled up or interfaced my skirt because it’s definitely lighter than Neptune’s and moves more/gets crushed easier but whatever, what’s done is done. That being said, I wanted to do the pleated skirt like in the anime as opposed to a circle skirt or flounce and I know DICK ALL ABOUT PLEATING so I started by watching 5 billion tutorials and reading up on it. Then I made up a pattern with an arrangement I liked.
I ended up dicking around and figuring out for the sailor fukus I liked the look of a pleat that is 2inches at the top and 4 inches at the bottom with a total of 7 pleats in the front, 5 in the back. Factoring in the middle pleat at 2.5” at the top and 4 at the bottom, I started with around 90 something inches of fabric at 13” width. The skirt is self-lined: sewn together and then turned rightside out and pressed. I added top stitching along the bottom to keep the two layers together and for the look, not completely necessary. I then sewed down the top of the skirt leaving 1inch seam allowance so from bottom to that stitch line my skirt was 12inches.
Started the pleats out by folding my fabric in half to find the median, marked it, then unfolded and marked off 2.5” at the top and 4 on the bottom. The middle pleat is a box pleat so I marked off 4 inch on eitherside of the top and 2 inch at the bottom and then folded these in to create the middle. Pressed. Then I needed 3 knife pleats moving away from the middle pleat, so I got this to work by alternating the 2/4 measurements along top and bottom then folding and pressing and pinning. After I got my 3 knife pleats on each side of the middle, I left 3 inches of extra space (to get the effect of a godet) so there would be extra fabric on each side of the hip. I did this because we wanted more anime flare and planned to add mini petticoats on each hip to achieve this look which required extra fabric. I started pleating the opposite way so that the knife pleats would lie in the opposite direction. I just liked how this looked better. I futzed around and made a back pleat that resembled the front box pleat and then cut off the excess fabric I had. Pressed and pinned everything then sewed down the top of the skirt to keep all the pleats in place then closed up the back and finished the seam. Now, at this point the skirt would definitely not go up my hips since I’m like 24/25 at the waist and 36 at the hips but that’s supposed to happen since the opening becomes big again once I cut the V-line into the top of the skirt (though JUST enough lol, tight ass piece of crap skirt.)
Anyway, cutting the V-line into the skirt really depended on the fuku measurements, so this part happened after I drafted the fuku pattern, but the length of the skirt from end of V point to hem in the front turned out to be approx. 9inchs and in the back, 10.
Fuku: I drafted this pattern by taking some shitty old silver lamé had lying around and sewing up the segments based on measurements of our old fukus. When I put it on there were a few adjustments to make so QD drew those on for me while I was wearing this and then I seam ripped it and retraced the right pattern onto broad cloth (since I really have too much of that lying around, more so than paper lol). Also, since we’re twins we have 1 pattern that works for both of us. The fuku basically 3 parts at this point; the top part with the stupid inverted V front seam, the stomach, and the panties. Also our torsos are stupidly short so my stomach piece is like only 3inches in length.
Using stretch stitch for all of this!!!!!
First I put the inverted V points in (look up how to sew a point this will save your life) and then did up the back panels. I didn’t bother to double or anything this time because you know what the ‘armor’ part never looks like anything when photographing white spandex!!!!!!! I’ve tried and it never shows up and I don’t want to make a separate piece??? So... yeah. I dunno. Anyway I sewed those together with the stomach pieces so I had a top with a V line hanging open on the front and back (!!! This was important to put a V in the back the skirt too so that my hips could fit and the hiproll would curve over the hips properly). I closed up the shoulders and cut my neckline. The neckline has to be just big enough to be covered by the sailor collar but also to be able to get hips through since these pull on that way.
Alternatively could have added snaps to the panties and get in through the bottom, but I wouldn’t relish in trying to get my shoulders and arms through that hiproll vice.
At this point, QD patterned a test sleeve and hiproll to see how wide we had to make them so that when stuffed it would not be overly stuffed or too thin. Proportion was key. Once that was done, she transferred the patterns to broadcloth and I cut out two copies per fuku. I sewed in the point for the front and the back and then sewed on THE OUTSIDE of the hiproll to create the channel for stuffing, effectively creating a belt with seam allowance. I left a bit of the roll open at the back point for the stuffing. I then used the seam allowance to sew the hiproll to the fuku top. I did this BEFORE stuffing the hip roll just because it was easier for me than dealing with sewing a big puffy loop that might’ve gotten stretched or distorted after I stuffed it. When the hip roll was on, I then stuffed it (which took foreverrrrrrr stupid polyfill) and stitched the back closed. I use polyfill for the stuffing because I’ve used foam in the hiproll before in my very first try at a fuku and it RIPPED. Putting such a delicate material in the problem area of the fuku was not a good plan. Polyfill doesn’t rip and it stretches with the spandex so it’s the best use for the hiproll imo unless there’s stretch foam or putting a zipper through the hiproll or something. The sleeves were similar to the glove rolls, where QD top stitched the channels in and then stuffed them. We had to hand sew these on because they were pre-stuffed. The sleeve rolls have always been delicate part of the costume for us and kinda awkward to do. I dunno, it could’ve probably been machine sewn on but hand sewing was successful.
Next comes attaching the skirt to the fuku. (I didn’t forget about the panty portion, that comes last). I sized the Vs for the skirt, lining it up with my fuku pattern. I topstitched the Vs in, then cut leaving seam allowance. I needed to try on the skirt to keep trimming the V in order to make sure it could come up my hips. Once I got an exact fit, I hand sewed the skirts to the seam allowance made up of the hip roll and fuku top. OTL This could probably be machine sewn too but I honestly don’t trust myself to get it close and accurate enough because I’m clumsy enough with the machine as it is and there’s nothing worse than having to seam rip delicate spandex (I’ve ripped enough holes in my past...) I used two rows of hand stitches to attach each skirt and then cut out all the excess seam allowance to make as much room as possible.
Now, I stupidly sewed up the panty bottoms ahead of time while I sewing the rest of the spandex and forgot to leave the crotches open because that would’ve made it less awkward to pin/sew these on. The panty pieces had a V hemline already cut into it, so I just lined this up to the skirt/hiproll and pinned, then I handsewed this in too with 2 rows of stitches.
I tried it on. TIGHT TIGHTTTTTT gawdd it’s so tight lmao. I stick my feet through the panty holes, twist the spandex so that the points of the Vs on the front/back are on the sides of my hips for maximum room and---- shimmy. The fuku itself is comfy (except for extreme wedgy, which gets fixed by wearing the dance tights underneath) but getting it up over the hips is a trial from hell. But it does come up! Just gotta wriggle. After that, I took it off and it was more handsewing time. First I hand tacked the front and back Vs of the hiproll to the skirt to help clean up the shape and make sure the point kept its form and rested flat against the skirt. Because of the tension the hiproll creates, the front and back V points like to pop outwards but I didn’t want to hand tack these down to the panties for fear of ripping them while I wriggle in and out, so I sewed a med size snap underneath the points and snaps to the panties so I can snap them down and have them lay nice and flat, then unsnap when I want to put it on/off. I then sewed snaps for the front bow at the neckline of the fuku and snaps for the butt bow on the back of the hiproll. Everything seemed good at this point!!!!!!! Almost done!!!!!
I cut some tulle and gathered/sewed it into small petticoats just for our hips. I’m currently waiting for my wig to arrive so I can style that and see how big my head looks in relation to my hips so I know how much tulle to add underneath the skirt for proportion’s sake. I plan to just hand stitch the tulle on when that happens.
Wig: The wig was originally very long and wavy. I put the wig on and my sis QuantumDestiny cut it to just shoulder length for me at which point it looked exactly like Meg Ryan from "You've Got Mail" which is wonderful and very 90s but not the look I was going for obviously. So anyway after the length was hacked off I used the natural wave of the wig to cut the bangs. I then teased and backcombed the HELL out of the right side of the wig to get that 90s anime lift and did teasing (but not as much) on the back and the left side. I then trimmed the top unteased layer as I combed and hairsprayed the hair back to cover the nest of backcombed stuff. Then I used the leftover wig hair to fill in any place that needed a bit more smooth hair and used hairglue to shape the long 'swish' hairlock and the top curl. Was a lot easier to do than it looked actually. It took me like 2.5 hrs to finish tbh. Just had to put it on again and trim the bangs to frame my face and use bobby pins in the back to keep it looking boyish.
- Personal Thoughts:
- Everyone wants to cosplay Uranus/Neptune you can't deny this
Add a Comment




Sorry, you must be a registered user of and logged in to view and add comments. Either log in or register now!