ACParadise Network:
American Cosplay Paradise
American Cosplay Experience
American Cosplay Snapshots
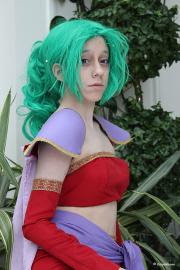
Cosplayer Kaiyakkuma > Costume of Terra Branford (Final Fantasy VI)
- Most Recent Photo
- 03-19-2013
- Series
- Final Fantasy VI
- Character
- Terra Branford
- Special Variation:
- Sprite ver.
- Year Completed:
- 2013
- Construction Difficulty:
- Normal
About this Costume
- Construction Details:
-
☆ ☆ The Making of Sprite Terra ☆ ☆
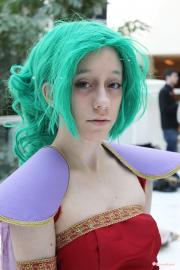
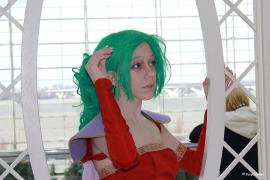
♡ Wig: I used a 90cm Seafoam Green wig from CosplayWigsUSA, and tied it into a ponytail and attached a medium hair clip to the back. I did a lot of styling to the fringe. Since this is Sprite Terra, I looked at her game portrait as a reference and tried to style it as accurately to her game sprite. I used only a straightener and Got2b hair spray to style the wig. I wanted to add a little Amano-esque into my cosplay, so I added small glass pearl beads into the wig. I threaded the pearls into strands of wig fibers with a small pair of scissors, since I didn't have tweezers. Also, this was before I knew that most cosplayers glued the beads onto the wig. Hehe! But I think threading them is better!
♡ Make-up: For my eyebrows, I used school glue and brushed the glue onto my eyebrows with a paintbrush. I also used a light green acrylic paint. The paint blended in so nicely with my wig! ♪
( The rest of the make-up will be demonstrated in a video tutorial. )
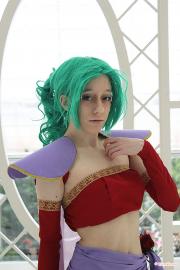
♡ Shoulder Pauldrons: In the making of this cosplay, I was very determined to get the pauldrons to look like the ones Terra wears in the game. At first, I started making them with polymer sculpting clay, but it was way too heavy and they kept falling off my shoulders. So then, my Dad came up with this idea to make the pauldrons out of plastic with fabric over it. I didn't like the idea at first, but when we finished them, they looked AWESOME! The base for the pauldrons was a plastic canvas circle. This is what it looks like:
http://www.joann.com/images/11/53/4/xprd1153477_z.jpg
The plastic was bendable, but in order to make it arched and stay on my shoulders, my Dad folded it and heated it with a blow dryer. But that was AFTER we sewed the fabric onto it. For the sewing part, first we sewed a square, slipped the plastic circle in like a pillow case, then sewed around the circle. Then I cut the corners off. Next, I added a simple gold trim around the edges of the circle to create a more 'armor' look; and also, to hide the rough edges.
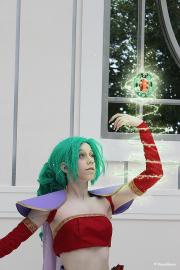
♡ Cape: Making the cape was fairly simple. I picked out a lavender, slightly-transparent fabric. I layered the fabric when making the cape, because it was very see-through. The cape was attached to the shoulder armor by the extra straps from my top.
♡ Top Shirt: The top shirt was a pain in the butt for me. But my Dad's girlfriend helped me a lot with the apparel portions of the costume. For the top, I decided to use a halter top pattern. The shirt itself is much longer than what my photos show. I made it shorter by tucking the edges into my bra. I added gold trimming to the top and it looked really pretty~ I picked it out myself! We also attached a zipper to the back, but it doesn't work very well.
♡ Arm Sleeves: The sleeves were very easy. All I did was fold the fabric, sew the sides, and add gold trimming on the top. I measured my right arm incorrectly on one of the sleeves, because my right wrist is a bit more thicker than my left wrist. So, pulling off that sleeve was work for me. Oops!
♡ Skirt: There isn't much to say about the skirt, since it has the same concept of the top and sleeves. I used a miniskirt pattern to reference it off of. There is a zipper on the back of the skirt, but it slightly works. Also, I added gold trimming on the top of the skirt, but it is hard to see in most of my photos.
♡ Sash: The purple sash was made from left-over material of my pauldrons. I just tied it around my waist and added an artificial rose in the knot.
♡ Boots: I am not very fond of the boots I used for Katsucon 2013. I didn't get many pictures with them, except for this one:
http://www.flickr.com/photos/dtjaaaam/8491632883/
These boots were originally very old black boots I used to wear a lot in middle school. And since I didn't have time to search for pointed boots, I used them as my Terra boots. Hehe! I spray painted them dark red, and after letting them dry, I used about 2-3 layers of gold paint around the sides and tip of the boots. For the shoelaces, I used some spare yellow-gold ribbon. - Personal Thoughts:
- My first handmade costume. ♡
Wig Details
- Wig Brand
- Cosplay Wigs USA
- Wig Name
- 90cm/36" Extra Long Wavy/Curly
- Original Color:
- Seafoam Green
- Styling Time
- 2-3 days.
- Wig Quality Rating
- 5 / 5.00
Add a Comment




 Upgrade Cosplayer
Sorry, you must be a registered user of and logged in to view and add comments. Either log in or register now!