

ACParadise Network:
American Cosplay Paradise
American Cosplay Experience
American Cosplay Snapshots
Cosplayer Aduial > Costume of Yuichi Komura (Hiiro no Kakera)
- Most Recent Photo
- 10-04-2011
- Series
- Hiiro no Kakera
- Character
- Yuichi Komura
- Year Completed:
- N/A
- Construction Difficulty:
- Difficult
- Awards
- Judge's Choice AWA 2011
- Costume worn at:
- Anime Weekend Atlanta 2011

About this Costume
- Construction Details:
-
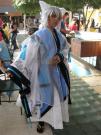
In total, there will are 4 kimonos going on for this cosplay.
Kimono 1 is plain white stretch poplin with a gray/silver satin collar. Nothing special about it.
Kimono layer 2 is constructed of white sateen cotton and black sateen cotton as "trim." The sleeves have been gradient dyed and then screenprinted with the design. The gradient is very, very light; this was not intentional, but I didn't attempt to redye for two reasons. First, I feared f**king up what I had already done. Second, there are some images where the gradient isn't present. The design was scanned from an artbook, blown up, resketched, and then turned into a thermofax screenprint. The paint used is Simply Screen screenprinting paint in Tin Foil. Two yards of black sateen cotton and velcro were handstitched to the sleeves where the armor attaches.
Kimono #3 is made of light blue sateen cotton with black sateen cotton for trim. The pattern for this kimono is the same as the other two minus the sleeves. A total of 7 spools of turquoise ribbon was used on this kimono. The four wooden beads were spray painted metallic silver and then hot glued to the ribbons.
Kimono #4 is white organza with a rolled hem edge and a zig-zag stitch. I modified the upper portion where the sleeves are supposed to be. This is one of my least favorite parts of this costume since the organza is really difficult to work with and not as transparent as I would like.
The "armor" is made of polystyrene plastic sheeting hot glued (and curled) to thick white craft foam. Hot glue was used as decorative edging (I seriously f**ked that one up though, first time doing it). They were then spray painted metallic silver. The rings were white plastic sprayed painted silver, hot glued to painted polystyrene strips, and then hot glued to painted wooden beads and turquoise ribbon. Velcro was hot glued to the craft foam side to attach to the second kimono layer; the third kimono layer is attached by ribbons through the rings.
The hakama is made of white twill. It's a standard hakama, nothing special about it other than that it has an opening to allow the tails to go through. There is a zipper and a pair of hook and eye to keep the bottom portion under the tails closed.
The belt is one layer red sateen with a layer of twill for "thickening", one layer of yellow stretch poplin, both handsewn together and closed with two snaps and two hooks and eyes. Light blue sateen was cut out into according shapes and then edged with handmade black sateen "bias tape." The panels were then handstitched on and gathered where needed. A strip of white sateen was stitched and then attached to a silver ring (made of styrofoam, painter's tape, modge podge, and silver paint); the tassels are made of white yarn.
Black twill tabi were made with gold vinyl embellishments. The tabi were then handstitched to gold sandal bottoms with embroidery thread. They close with two hooks and eyes each.
The necklace is made of three strips of black sateen cotton, four painted wooden beads, gold toned jewelry findings, and hand cut brass sheet strips. They are sewn together and then tied with satin ribbon.
The tails...oh god the tails. I have a waist cincher underneath all of that fabric. Each tail is sewn from fake fur, darted to add the curves, and then wired with 2 strands of 12 gauge aluminum wire. Each tail is stuffed with 11 yards of white netting, sewn up, and then sewn together into right and left sections. The right pair is hot glued to the left pair, then all 8 wires are wrapped and glued with more hot glue and white felt. The ends of the wires are hooked to the waist cincher. All the kimonos are opened at the bottom and have three sets of hooks and eyes to closely close them beneath the tails.
The ears are made of the same fake fur and white felt as the tails. They have a layer of interfacing inside to keep them a little more shaped. Both ears are sewn directly to the wig to keep from flopping back and forth...or even falling off. I hairsprayed straight some of the wig fibers inside the ears to 1) hide some of the seamage and 2) mimic the ear tuffs seen on cats, canines, etc. My cat was less than happy that I kept playing with his ears to see how the tuffs work. :3
The tattoos were sketched using references, colored, scanned, cropped, and printed; they paste onto the skin and wash off with soap and water. The nails were purchased off of eBay and are held on by nail "tape." Contacts are Angelic Yellow from Marietta Vision (I wanted Cat Eye Yellow but they didn't come in prescription). - Personal Thoughts:
- This cosplay has been two years in planning, 3 months in making. I have not yet played this game, but I love the artist and the character designs. I have an affinity for fox/kitsune characters so Yuiichi immediately grabbed my attention. When I saw his character designs for Hiiro no Kakera 3, I jumped onto wanting to do his "awakened" form. It's taken a long time to collect the pieces and mentally figure out how to put it all together. The sewing part wasn't difficult, but there are a lot of firsts (sometimes seconds) on this cosplay and a lot of things learned.
Also, don't know who took these photos. If these are yours, let me know.
Add a Comment


Sorry, you must be a registered user of and logged in to view and add comments. Either log in or register now!