ACParadise Network:
American Cosplay Paradise
American Cosplay Experience
American Cosplay Snapshots
Cosplayer Saya > Costume of Tess (Princess Ai)
- Most Recent Photo
- 04-21-2010
- Series
- Princess Ai
- Character
- Tess
- Special Variation:
- First outfit
- Year Completed:
- N/A
- Construction Difficulty:
- Very Difficult
- Awards
- Best Overall Naka-Kon 2010
- Costume worn at:
- A-Kon 2010
- Naka-Kon 2010
About this Costume
- Construction Details:
-
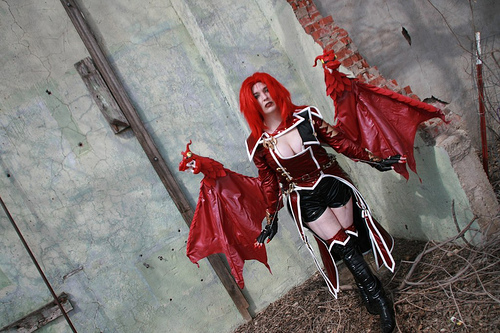
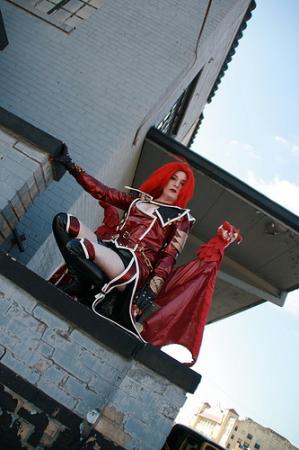
Jacket-For Tess’ jacket I had no color photographs to go by so I decided to pick a color scheme based on her wing and hair color. I chose a dark red and black color scheme and decided on PVC fabric b/c of it’s leather like look. I drafted the pattern for the jacket out of muslin and sewed a mock-up first. The final jacket was done in wine PVC fabric and lined with standard black poly lining. The manga pictures clearly show a very light colored binding, so I chose a white vinyl fabric. I made the binding 2in wide then folded it over and joined them using a bridging stitch. The jacket fasteners had to be made from scratch because they did not exist. To make them I used a large gold safety pin placed between the lining and PVC. I poked the safety pin thru the PVC and then formed the main body using Friendly plastic and gold elastic cord. Once the Friendly plastic was set up I used Rub and Buff, to color it. I used simple gold buttons to complete the fastener. Shoulder Armour- was made using Styrene. I traced the outline of the pieces directly onto the Styrene then cut them out. I traced the outline onto black craft foam, but I cut it out slightly smaller than the styrene. Using a high temp hot glue gun I attached the craft foam to the back of the styrene pulling and bending the styrene into a rounded form. I then used Rub and Buff to paint it and sealed it off using Floor Wax. I attached the pieces to the jacket using a hole punch and gold rivets. Broach-I used lightweight Sculpey to sculpt the broach. Once it was cooled from baking I painted using Rub and Buff then sealed using a glossy acrylic coat. I hot glued a pin base on the back to attach to the jacket. Wrist Armour- I cut the outline out of Styrene and then cut a craft foam outline slightly smaller. I attached the foam to the styrene in the same fashion as the shoulder armour. I used thick black craft foam for the pattern on the wrist armour. I traced the pattern then cut it out and attached it to the other side of the styrene using hot glue. I covered the edges using Friendly Plastic and painted the entire thing using Rubb and Buff. I also added a black wash to simulate an antique look. I sealed the amour using floor wax. For the attachment straps I glued two layers of black pleather together and let cure overnight. I then cut the straps out and riveted them to the wrist pieces. I set heavy-duty snaps for the closures. In an attempt to recreate the large screws seen in the reference pics I used Friendly Plastic to make a “fake screw” then painted using Rub and Buff. I sealed them with acrylic gloss and then hot glued them to the wrist armour. Boots-I bought a pair of boots at goodwill to use as my base. I cut the calf portion off of the base boots. I drafted a pattern for the thigh high boots using scrap fabric. Once the mock-up was acceptable I cut the pattern out of black PVC and the accents out of the red PVC. I placed a small length of zipper on the back seam of each boot to facilitate putting them on easier. I removed the material from the heel of the base boot and covered using black PVC. I then added the red PVC accents and white Vinyl binding. Shorts-I used for the shorts and made them out of black PVC. Wig-I used a Kankelon beast in ravished red and wefted extensions as my base wig. To darken the red somewhat, I dyed the wig and extensions using the FW ink method, using black ink. I then attached the wefts to the back to simulate the “mullet” hairstyle Tess has. The base wig was entirely too fluffy so ended up using thinning shears and thinning the wig significantly. I cut in the bangs and styled the wig as well. Wings- We needed to make many modifications to re-create the Furies wing structures so we began by making a wooden mock-up of the base design. We then played with the angle’s and opening distance between the upper skeleton and the lever arm until we were happy with our design. Then it was off to the hardware store to see what was available for construction materials. After spending a few hours at Lowe’s, we decided on using ¾” PVC pipe for the first two arms of the upper skeleton and ½” high temp PVC pipe for the last (longest) arm of the upper skeleton. For the lever arm, we chose ½’ flat aluminum bars so then would be easier to hide in the latex membranes but still remain strong. We used standard hinges for the joints between the upper skeleton arms and created a “home-made” joint for the attachment point of the upper arm skeleton into the board. This home made joint was done to mimic the wing bones coming out of the Furies backs but still give us lots of movement. To finish things off we also bought screws, nuts and bolts as well as PVC cement and primer. We also purchased thread mount and 1/16” cable and screw eyelets. We used a table saw, drill press, miter box saw and jig saw to cut and prepare all the pieces. For Tess I made a pattern for the wing membrane using scrap fabric before cutting the latex out. I then attached the latex membrane to the wing skeleton using ammonia base latex glue. I used very small diameter PVC pipe for the minor bones of the wings and trapped them in the two layers of latex with latex glue. I let the glue cure for 24hrs. I sculpted the dragons using lightweight sculpey around a wire mesh core. Once it was baked and cooled and painted the dragons using acrylic paints then glazed it using sculpey glaze. I placed PVC pipe elbows into the dragons using hot glue then filled hollow spaces using Gap Foam. Once the gap foam had set up I trimmed the excess using a nail file them cemented them onto the wing skeleton using PVC primer and cement. I cut scales out of red craft foam then glued them onto the dragons and wing membranes. I then polished up the latex as final touch.
Add a Comment


Sorry, you must be a registered user of and logged in to view and add comments. Either log in or register now!