ACParadise Network:
American Cosplay Paradise
American Cosplay Experience
American Cosplay Snapshots
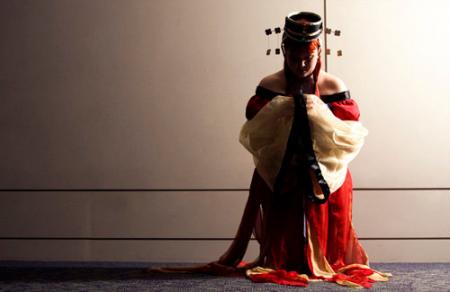
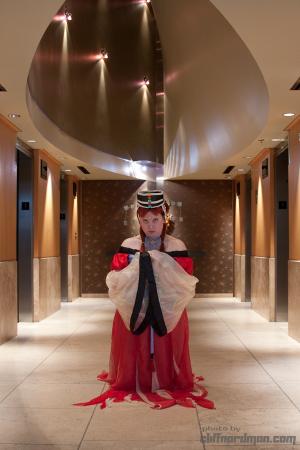
Cosplayer TheWindySea > Costume of Princess Kakyuu / Fireball (Sailor Moon Sailor Stars)
- Most Recent Photo
- 10-12-2011
- Series
- Sailor Moon Sailor Stars
- Character
- Princess Kakyuu / Fireball
- Year Completed:
- 2012
- Construction Difficulty:
- Costume worn at:
- Aki-Con 2010
- Anime Expo 2010
- Kumoricon 2010
- Sakura-con 2010
About this Costume
- Construction Details:
-
Making Princess Kakyuu was a three month process. There was a lot of making and altering patterns to suit the needs of the costume, which was a huge learning experience for me. And because I used fabrics I don't normally work with, organza, chiffon, satin, that was also a learning experience.
I started with the bodice and used a simple corset pattern from McCalls. I cut out one of each of the lining, base fabric and sheer overlay. I used a red and gold brocade with the gold organza overlay to get the color that I wanted based off the manga image I was using. I sewed each of the layers together individually and then sewed them together. From there I put in an invisible zipper and sized it to better fit me. I then patterned and cut out the design on the bodice. With a lighter, I burnt the hem of the light blue. I sewed a flat black bias tape on the bottom of the white triangles. Before I sewed the triangles onto the bodice, I sewed the same flat black bias tape onto the sides of the white panel that went on the front of the bodice, then I sewed the whole thing on the front. From there I then sewed the triangles on. The sleeve poofs where simple tubes that I gathered and put elastic in the bottom to create the shape. From there the flowy sleeves where a rectangle that where gathered at the top to give the bell shape.. Once the whole thing was put together. I then sewed a black satin blanket binding around the top, the bottom and the sleeves. I used a fancy stitch to sew the blanket binding onto the bodice and sleeves.
After the bodice was complete, I started work on the pantaloons. I took a basic shorts pattern and altered it to get the right shape. From there I cut out the fabric, the same red satin that I used on the sleeve poofs. I put elastic in the bottom of the shorts and for the top I used the same black blanket binding and fancy stitch as I did on the bodice.
For the skirt I used two different colors, a red and a gold. I put the gold in the middle of two layers of red. I had made the pattern for the petals. I then cut out all the petals and individually did a burn hem for all of them, to match the burn hem I did on the blue of the bodice. After that, I laid them all out and used black blanket binding to hold them together. I was originally going to sew them onto the bodice, but couldn't come up with a good way of doing that, so I opted to make it separate. I used the same fancy stitch as I did on the rest of the costume and used a skirt hook as a closure.
The accessories, crown, hair sticks and choker where relatively simple. I dyed white cording the pale blue to match the bodice and then twisted it into the right shape. I used a hook and eye to close it. The crown and all the flowers where made out of craft foam. I cut them into the right shape using an exacto knife and scissors and then spray painted them. I did a layer of a spray sealant, then the color (black for the crown and gold for the flowers) and then a final layer of sealant. I shaped the crown and glued it together using hot glue. For the gold strips, I used a pale gold bias tape. I strung pearls onto some wire and then glued them around the base of the crown. I then added the jewels, which I got in a pack at Jo-Anne's. The side pieces of the crown was fabric that I reinforced with interfacing (I used fabric for easier transportation). I glued the same pale gold bias tape on there and then a flower at the bottom of the point. I did the clusters of flowers for the sides of the crown. For the hairsticks, I took skewer sticks, spray painted them gold, glued the flowers on (one on each side) a thin gold chain and more flowers. - Personal Thoughts:
- One of my dream costumes that I was so happy that I made.
Wig Details
- Wig Brand
- laurawu
- Wig Name
- 51" Extra Long
- Original Color:
- Cherry Red
- Styling Time
- 3 Hours
- Styling Notes
- I have gone through two wigs and about four different styling methods to get this wig right. This is the method that I used to wear it at Aki-Con'10 and it hasn't come down yet.
I pulled the wig up into a mid-height ponytail and left two chunks in the front. After that I separated the ponytail in half. From there, I separated each half to wrap around a thick wire, so the loops held their shape. From there I wrapped the hair around the shaped wire, crisscrossing which half went first. After each loop was wrapped, I wrapped the excess hair around the middle and secured it with several bobby pins. Then I sprayed it with hairspray to smooth down any flyaway wig fibers.
Add a Comment


 Upgrade Cosplayer
Sorry, you must be a registered user of and logged in to view and add comments. Either log in or register now!