ACParadise Network:
American Cosplay Paradise
American Cosplay Experience
American Cosplay Snapshots
Cosplayer Tomecko > Costume of Kairi (Kingdom Hearts 2)
- Most Recent Photo
- 10-07-2010
- Series
- Kingdom Hearts 2
- Character
- Kairi
- Year Completed:
- N/A
- Construction Difficulty:
- N/A
- Costume worn at:
- Anime Detour 2010
- Kumoricon 2010
About this Costume
- Construction Details:
-
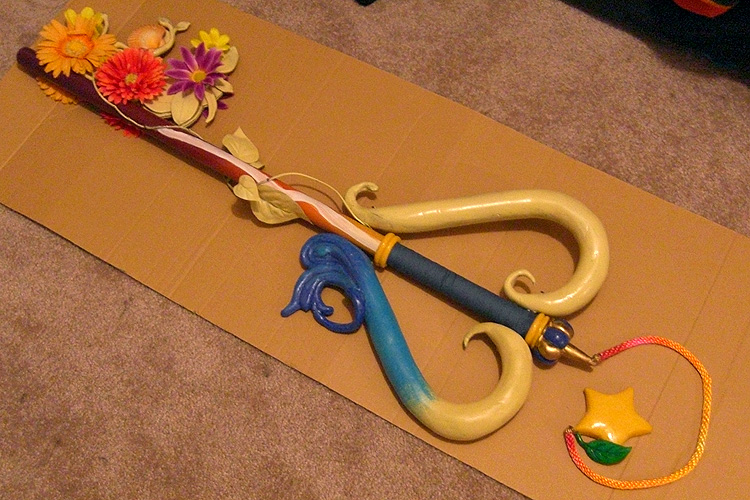
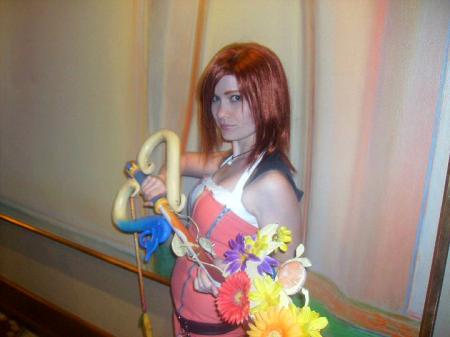
Dress - Heavily modified from Simplicity pattern 2848. I looked far and wide for fabric in just the right shade of pink - I wanted to base it off the game model, which is a coral pink, rather than the baby pink you see most everyone wearing (I won't rant about the inaccuracy of that here). Finally found a perfect fabric online, a nice coral pink stretch twill. The dress is lined on the inside with a matching pink. All the seams are topstitched down. The zippers really work, and aren't just tacked on top. They also have the accurate double zipperheads. They started out black, and were spray painted silver. There are silver eyelets beneath the bust. Halter Top - The hood was gleaned from Burda pattern 8042, but the top itself was created on the spot. The white fabric was sewn double thick (I am a fan of opaque cosplays). Both fabrics were purchased online. I especially love the hood fabric, which is a silky soft heather-black cotton blend. A row of lace was added around the top of the halter, though someday I'd like to find a more accurate scalloped lace. The halter is completely separate from the dress. Belt & Bag - The pattern was created on the spot. Sewn from leatherlike car upholstery fabric. It was difficult to get the leather to fold down for seams, but I managed with the help of No-Sew Tape (my best friend in sewing). All the metal fixings were found in the purse-making section of my local Jo-Ann's. One seam on the belt contains hidden Velcro, which makes taking it on and off a snap. The snaps on the bag are merely decorative, though it stays closed with more Velcro. At first the bag was too floppy, but I chopped up a cereal box and made an inner box that keeps the bag nice and rectangular. Wig - I frikkin' love this wig. Purchased from Cosworx.com, I believe it was a Sepia brand in Henna Red. The color is perhaps a little *too* bright red for Kairi, but I have yet to venture into wig dying. I had to cut bangs into it and re-part the wig. Shoes - The easiest part of this cosplay! I got cheap white off-brand laceless hi-tops from Amazon.com, colored them in with a lavender marker, and painted the soles black. Unfortunately, paint doesn't stick to rubber so well, and it has since been touched up with black Sharpie. I added in black ribbons for laces, which never stay up on their own - they are held up with, ta-da, more No-Sew Tape. Makeup/Accessories - Kairi's bracelets were made from a 3-pack of bangles from WalMart, only one of which had to be spray painted blue. Her necklace was made from black silk cord and a Fimo pendant, which I painted white and then topped with pearly nail polish. Kairi has a more natural look, so I just wear my own usual makeup (neutral tan eyeshadow, brown eyeliner, lipgloss), and darken my eyebrows with auburn eyebrow pencil. 'True Heart' Keyblade - Hands down, the hardest and most time-consuming part of the costume. I can proudly say that I made this 100% myself. The shank of the keyblade is formed by a wooden dowel. I wrapped the end with blue bias tape for the hilt, and capped it with rings of Fimo that I'd painted yellow. The gradient of the blade is hand painted with acrylics and coated with hi-gloss spray paint. The bit on the blade is formed of a foamboard backing, with Fimo leaves reinforced by wire glued to the top. The bit was then spray painted a creamy yellow. I carefully selected some silk flowers after squinting at screenshots, and hotglued them to the Fimo leaves. The flowers are doubled on the back of the bit. There are 'structural' bits of Fimo added to the base, which help it attach to the blade, with the help of some screws, nails, and hotglue (my best friend in prop-making). I'd like to replace the bit with a carved wooden piece someday, which I feel looks better, and is a great deal more durable. The hilt guards were the toughest part. First, I found a dense Styrofoam heart-shaped wreath and snapped it in half. Each half was covered over with air-drying clay, shaped by hand and with some clay modeling tools. After it was dry, I sanded the surface to make it appear smoother. Then they were spray painted the same creamy yellow as the bit. The blue fade was hand painted with acrylics. The guards are screwed into the hilt at two points. I'd also like to redo these at some point in wood. The pommel and charm were made of more Fimo, hand painted and glossed. The cord was a braided nylon cord from the hardware store, colored with markers. A jump ring was baked into each piece and attached to two large metal crimps, which hold them to the cord (with the help of craft glue). The ivy and leaves were made from fake ivy, which I stripped of all but a few leaves, painted creamy yellow again, and nailed to the keyblade in a few places.
Add a Comment


 Upgrade Cosplayer
Sorry, you must be a registered user of and logged in to view and add comments. Either log in or register now!