ACParadise Network:
American Cosplay Paradise
American Cosplay Experience
American Cosplay Snapshots
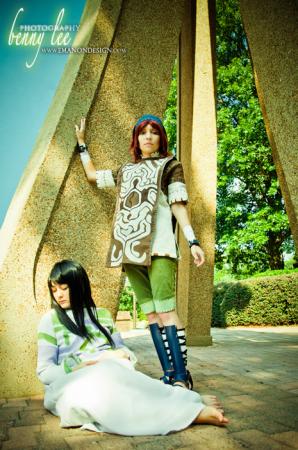
Cosplayer NiGHTmaren > Costume of Wander (Shadow of the Colossus)
- Most Recent Photo
- 12-21-2012
- Series
- Shadow of the Colossus
- Character
- Wander
- Year Completed:
- 2009
- Construction Difficulty:
- Difficult
- Awards
- Best in Show (Craftsmanship) - OhayoCon 2009
- Costume worn at:
- Anime Festival Orlando / AFO 2009
- Anime Weekend Atlanta 2010
- Anime Weekend Atlanta 2009
- FanimeCon 2010
- OhayoCon 2009
- Otakon 2011
About this Costume
- Construction Details:
-
Completed January 2009 -
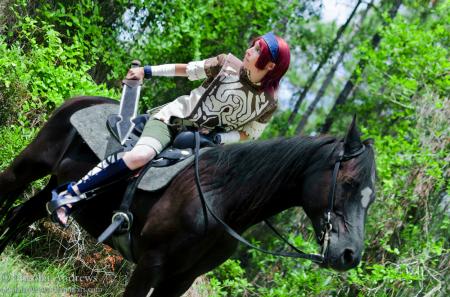
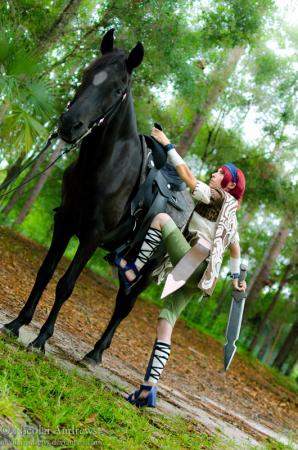
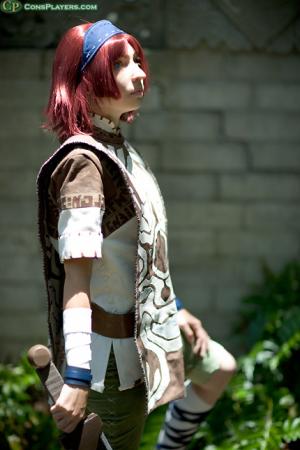
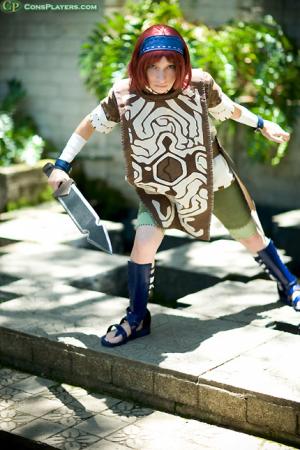
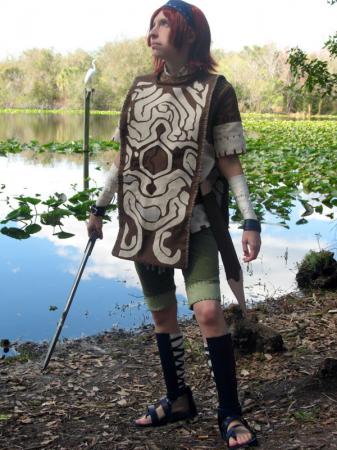
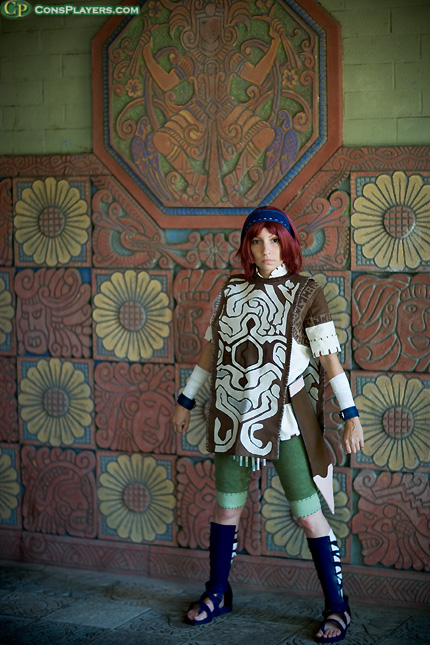
The design itself presented a few challenges. I wanted to mimic the somewhat grainy art style of the game, so I was very careful in my fabric selection and chose fabrics that have some subtle visual texture to them and were dull in tone to best represent that and give the kind of effect I wanted. I paid attention to how the fabrics look in-game and tried my best to match up the selection. I did a lot of research with gathering reference material and spent a lot of time playing the game just to observe the character's garments, how they fitted and moved and especially how the seams looked, as the design is one which actually shows the character's seams and unique stitching, and I thought that was very important. It took me a year to find all the fabrics I wanted for it - I'm so picky! D:
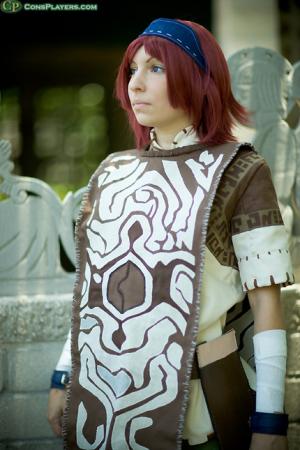
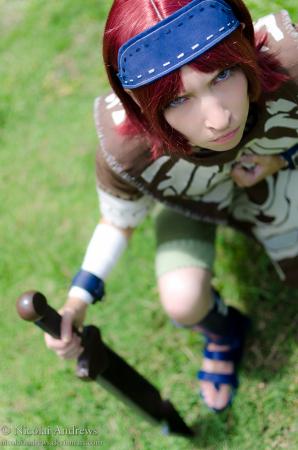
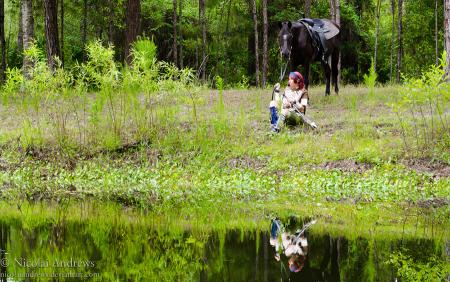
I decided to do 'beginning of the game' Wander, with cleaner clothing and redder hair. The wig was purchased from Cosplay Wig, and it has a slight flip to it which is very close to Wander's hair style. I used hot water to flatten the front of the wig out and razorred in the small bangs he has. It was a fairly easy to style wig. The headband was basic sewing, I patterned it out on muslin and chose some solid twill to use for it, I didn't want it to have stretch to it because of the hand-embroidery, so I had to make sure it fit right over my head and th wig. After measuring the circumference of my head I sewed the two fabric pieces together, and did a topstitch on my sewing machine just how he has it and then embroidered on the thicker lines by hand.
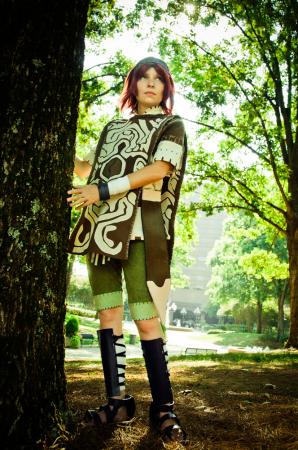
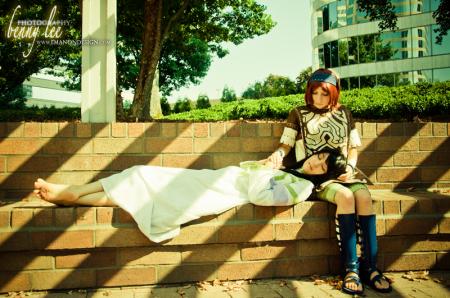
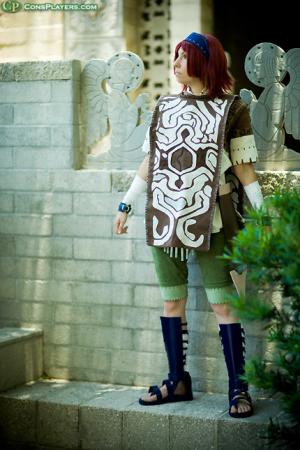
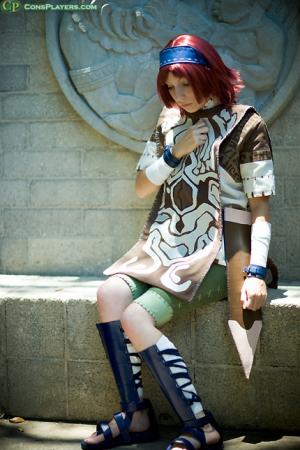
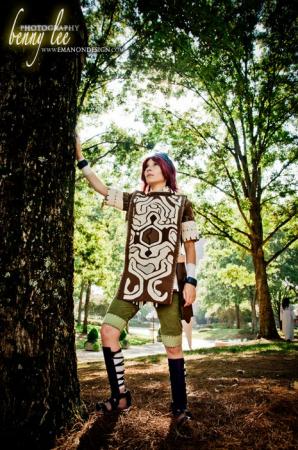
The pants were the first piece of garment I wanted to work on. Because of the embroidery work it entailed, I wanted to knock that part out first. I chose a nice suede fabric (Alova solid) for the pants, and I chose a sueded material that was the perfect type of color and material type used for couch covers and such for the alternating 'cuffs' - normally $21/yd, but thank God for half-off sales and only needing a 1/4 yd! I hand-embroidered the cross stitches over all of the seams, which took an eternity and it was a bit frustrating to get them to look right (right size, and getting the fabric to lay smooth while I did it - I purchased one of those embroidery hoops to make my life a bit easier with this task). I finished all the seams with a serger, even though only the alternating fabric frayed, I wanted it to look nice and neat on the inside as well as the outside. I also hand-embroidered on the darker green lines on the cuffs, which took forever, too.
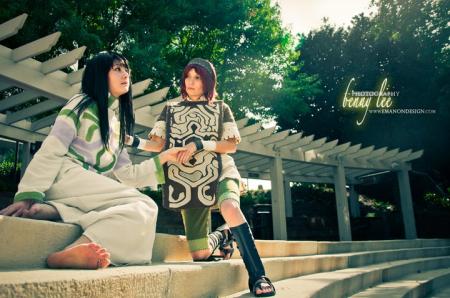
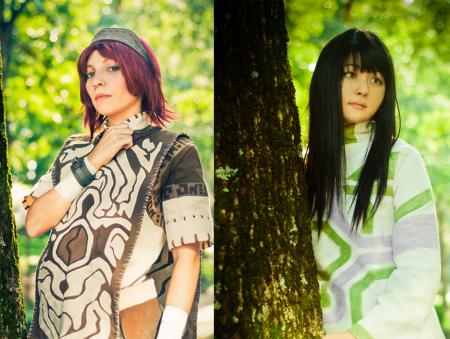
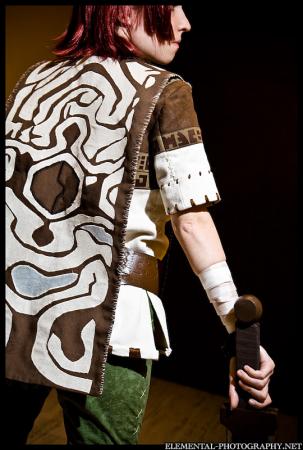
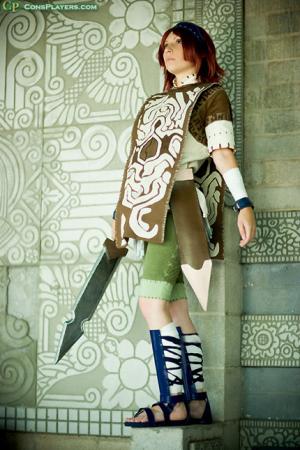
I used posterboard to create the tabbard stencil, which I used for the applique portion (the symbols). I had to have my artbook handy as well as have the game on the TV to make the stencil as accurate as possible, I was VERY anal about it looking just right since I feel it's the most important part of the costume. It took a few hours til I was satisfied with the shapes and proportions for the stencil, but I'm very happy with the results, it's to scale and I managed to capture all the details accurately. It took several hours to sketch it out and fix it up to my standards, then several more hours to cut out the shapes very carefully since the lines between are very thin and I didn't want to mess up. I then used the stencil and drew it out four times on the applique after I ironed it onto the fabric I was using for the shapes, cut the shapes out, and appliqued them onto the tabbard pieces (4 in all). One thing that was a bit tricky was that the front and inner back were the same, but the inner front and back were the same design FLIPPED, so I had to be very careful that I was applying the right design to the right piece and had to label the back with masking tape while making them. I did a satin stitch around all of the shapes with my sewing machine - it was roughly 30 hours of work at the sewing machine, give or take. I used fabric marker to shade in certain parts of the tabbard to achive the same weathered, multi color look his tabbard has. The edge of the tabbard is hand-embroidered with white thread to give the effect it has in the game. I didn't originally intend to have it there, but I got nitpicky and HAD to incorporate it - thankfully I still had the time because it took a while to apply. I also did embroidery all along the collar of the tabbard, over the bias tape I had sewn onto it. I wanted it to look as handmade and detailed as I could.
The undershirt was a bit complicated to pattern out, if only for the unusual seams (particularly the sleeves, oi!) and the overlaying brown 'top'. There's a lot of seams where normally seams should never exist, so it was a bit of a pain in the butt. For a while, every time I looked at the art of played the game I would notice something new, and be pretty glad I hadn't made that piece yet. The top involved a lot of applique, satin stitching, and hand embroidery. It took a while to pattern it out because of the seams and the number of pieces and how they fit together, and to get the design to look right. I would have to say it was the most difficult part of the costume, because of how complex it was and the details, though subtle, were very important to incorporate. I studied the art to try and figure out the symbols on the strips of alternating fabric, and replicated them to the best of my ability as they are VERY hard to make out! I then appliqued them onto the alternating bands and did some more satin stitching for the border of the strips. I had to be careful lining them up so they meet when I put the front and back of the tunic together. I had to do alot of math to get it just right. The sides of the tunic have embroided hand-stitched "X"s on them, as well as the seams for the sleeves. The sleeves also have embroidery stitches around the cuffs, to replicate the art. The collar has some minor embroidery, I discovered zooming in on the collar that there are some interesting stitches and a practically invisible seam halfway thru on there, so I really wanted to be sure I added that into the costume. I also put front and back facing in the collar section, just for craftsmanship reasons.
The belt was made out of leather shoulder hide, the thinner variety so it would be less bulky and still easy to tool the embossing on. Again, I had to study the references and in-game material to get a good idea of the patterns on his belt and how it is shape, it's rather unusual to begin with. The leather was edgecoated before working with it, and slicked around the edges to finish it. I then drew on the designs lightly with pencil, used a cutting tool to engrave it in, wetted the leather, and proceed to do the embossing with the stamping tools. This was very time consuming, because the tools are so tiny (they look like picks with a broad, flat surface that is pressed to the leather). I then painted the leather and did some aging with it, and did a similar method to the leather for the sheath. The sheath was also sewn together with wax thread, which was pretty painful! First I placed the holes in with a leather tooling fork, then I used two needles to thread the wax thread into the holes and bring the pieces together using a cross stitch with two needles. It was the most time-consuming handsewing job, taking about 12 hours to complete and left my hands kinda raw.
The belt dangles were pretty easy, I took wooden dowels and sawed them in half, took off he excess with sand paper, and painted them by hand. I gave them a somewhat faded look at the bottom to match what I saw in the screenshots. I have no idea what these pieces are supposed to be, I figure they are bones, and probably represent the status of the members of Wander's tribe. They make noise whenever I move, too, which is pretty neat, lol. I dremelled holes in the top, and used floss and hemp beads to apply them to the belt. I punched holes into the belt so I could just tie them bad boys on.
The sword is made out of balsa wood layered on top of eachother. The balsa was very light, I only had to use an x-acto knife to cut it out. Once they were bonded with Elmer's wood glue, I used sandpaper to create the blade edge. I then applied 3 coats of fiberglass resin to the blade with sponge brushes, and power sanded off the residue/bumpiness left by the resin. I applied the pieces for the overlay triangular piece on the hilt, one per side, and repeated the process. I had to powersand some more to get the edge back. The paint was spraypainted/brushed on with Rustoleum paints and I wrapped the handle of the sword for a better grip/better effect.
The sandals were made from scratch by taking apart a pre-existing pairs and just using the sole of it to work with. The straps are made out of leather hide, which were wet formed into straps (they maintain their shape this way) before doing the finishing work to the edges, edge-koting, and painting them, then finally applying them to the sandal. Figuring them out was a challenge but once I solved that part, making the sandals was actually pretty easy, just a bit of a pain because I had to make sure the staps were just the right size and going in just the right place. I left plenty of allowance to give the straps less strain. The inner straps are velcroed to the sandal, with the exception of the strap up front, so I can slide my feet into and out of them without straining them. Unforunately, the sandals ended up being very uncomfortable, even if they did look neat, they left my feet quite marked up and even dug a hole in the back of my heel, lol. Yay, blood!
The shin guards were also made out of leather hide, and wet-formed around the front of my shins so they maintain the shape and won't be stressed out too much by the straps that keep them on. I used a leather hole puncher to hammer in the holes where the bandage straps go thru.
The bracelets were the easiest part of the whole costume, I found a kit at Tandy's that was pretty much exactly like Wander's, so I just had to paint and assemble! Yay for easy accessories!
Also, pretty much all of the paint used for the leather was custom-blended to match the character art. It was messy, but fun, haha.
- Personal Thoughts:
- This costume was a dream of mine for nearly two years before actually making it - not only is this game amazing, but so is Wander and I absolutely adore all of Team Ico's works. Wander is a character that truly makes me feel, and the game is an emotional experience both through the storytelling and the art. I love being able to cosplay from something I feel so strongly about, and it's often hard for me to even put into words my love for this game and this character. Now that the costume is done, I must say I haven't been this happy with my work, since, well...possibly ever! To this day it is still my favorite costume and holds a lot of meaning to me because of my love for Wander's character and the game.
This costume was featured as a showcase costume by Cosplay.com on 09-26-2009, appeared in Cosmode: The Nation, and was also featured on GameInformer's CosBlog - http://gameinformer.com/blogs/editors/b/gimeagan_blog/archive/2010/03/17/cosblog-23-wanderer-by-hime-no-toki.aspx
Add a Comment
Photos
-
Photo 1

 0
0  700
700 -
Photo 2
 0
0  732
732 -
Photo 3
 1
1  665
665 -
Photo 4

 0
0  504
504 -
Photo 5
 0
0  937
937 -
Photo 6
 0
0  908
908 -
Photo 7
 0
0  613
613 -
Photo 8
 0
0  663
663 -
Photo 9
 0
0  600
600 -
Photo 10
 0
0  621
621 -
Photo 11
 0
0  713
713 -
Photo 12
 1
1  1027
1027 -
Photo 13
 0
0  746
746 -
Photo 14
 0
0  552
552 -
Photo 15

 0
0  550
550 -
Photo 16
 0
0  695
695 -
Photo 17

 0
0  513
513 -
Photo 18
 1
1  523
523 -
Photo 19

 0
0  484
484 -
Photo 20

 0
0  493
493 -
Photo 21
 0
0  888
888 -
Photo 22
 0
0  600
600 -
Photo 23
 0
0  954
954 -
Photo 24
 0
0  687
687 -
Photo 25

 0
0  492
492 -
Photo 26

 0
0  435
435 -
Photo 27
 0
0  968
968




Sorry, you must be a registered user of and logged in to view and add comments. Either log in or register now!