Asuka Chest Plate SKETCH done!

Need help with sewing techniques, or making a 10 ft sword? Seek help from other cosplayers here!
Post Reply
User avatar
lolita_otaku
Posts: 32
Joined: Thu Dec 15, 2005 9:22 am
Contact:

Asuka Chest Plate SKETCH done!

Post by lolita_otaku » Mon Feb 27, 2006 1:53 pm

Hello agian :D

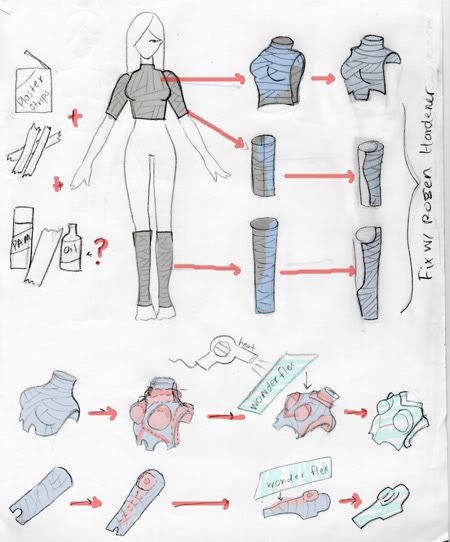
AS you may or may not already know, im working on Asuka's plugsuit, and trying to make the chestplate and sholder armor from wonderflex, sense this is something i have never done before ill looking for all the help or tips i can get!

bellow is a sketch of how i plan to make the wonderflex armor peices over a positive mold..


http://img.photobucket.com/albums/v212/ ... wecpic.jpg

~Steps~

1. First i would make a cast of my body ( well i friend would do most of the work i guess =P) from plaster strips ( and i think ill cover the plastered parts of my body in some kind of oil first so it doesnt stick..)

2. cut away the plaster cast from th body, and trim it down into the shape of the armor.

3. coat the plaster cast with hardining rosen for extra strength

4. add detail onto the plaster cast ( with air dry clay or more plaster? not exactly sure yet) then another rosen coat to prevent cracks or peices coming off.

5. Heat the cheet of Wonderflex with a heat gun and form around positive plaster mold.

6. Havent goten this far ... ummm i guess trim any extra wonderflex, finish smooth and paint =P


So tell me what you think.. is this going work!?
Any help of tips would be wonderfull!

~Thanks!


Sorry if this seems like a some what repeated from my other posts

User avatar
lolita_otaku
Posts: 32
Joined: Thu Dec 15, 2005 9:22 am
Contact:

Post by lolita_otaku » Tue Feb 28, 2006 12:52 pm

hummm, anyone have anything to say?
... please?
... :oops:

Astillar
Posts: 2
Joined: Thu Apr 14, 2005 6:49 pm
Location: Austin, TX
Contact:

Post by Astillar » Sun Mar 05, 2006 3:02 am

Well it sounds like you've been doing your research. You've pretty much got the whole process figured out. I've just got a few comments to make.

1) I'd recommend using vaseline to coat your skin. That's what I use. Vaseline's messy, but I get the feeling that oil would be even messier. Maybe baby oil would work, I don't know. There's also plastic wrap if you don't want to worry about clean-up at all.

4b) I think you might want to make a plaster positive of your chest to work with. When you finish the first cast of your chest, the plaster cast might be anywhere from 1/4" to 3/4" thick and the exterior will have all kinds of variations in the surface or whatever. But the inside will have an exact negative of your chest. So you coat the inside (the negative chest) with vaseline or mold maker, etc and cast that with your plaster. Pull it out and throw away the negative. Now you've got a positive cast that's identical to your chest. Add the various plugsuit details, slap some hot wonderflex on that and you've got your breastplate.
This requires an extra step, but I think it's worth it. As form-fitting as the plugsuits are, I think this will give you a better fit than using the backside of the plaster negative as your positive. And plaster's cheap anyways.

5)The only problem I can foresee here is that WF has a limit as to how much it will curve. Once you start making it into a hemisphere (or any other compound curve), wrinkles will start showing up around the edges from the material as it bunches up. If the cups of the breastplate are rather pronounced, this might happen, so that's where you might have some trouble. Everywhere else on the plugsuit should be find though.

Even though this procedure might seem to be more trouble than it's worth, I'm glad to see you're going the extra mile. Most plugsuit cosplays are just unitards that kinda flatten the player's figure. With these wonderflex components you should have a more crisp profile, that looks more like the anime design.
I'm gonna keep my eye on this costume of yours. Good luck!

P.S. Nice tutorial pic, by the way. It makes everything look so easy, doesn't it?

User avatar
lolita_otaku
Posts: 32
Joined: Thu Dec 15, 2005 9:22 am
Contact:

Post by lolita_otaku » Sun Mar 05, 2006 6:26 pm

Thank you so much for the feed back Astillar!
it was really a big help, and im definatly going to pour a positive mold from the origional, that was a good idea. Sounds like you have used wonderflex before would you have any tips on how to get it smooth? i have heard it has a slightly bumpy texture after its been heated

User avatar
Sterling
Posts: 1113
Joined: Sat May 29, 2004 4:56 pm
Location: North East, Ohio
Contact:

Post by Sterling » Sun Mar 05, 2006 7:55 pm

Sounds promissing. Make sure to get lots of pictures of the process too.
Image

Astillar
Posts: 2
Joined: Thu Apr 14, 2005 6:49 pm
Location: Austin, TX
Contact:

Post by Astillar » Sun Mar 05, 2006 8:18 pm

Well, whether it's been heated or not, wonderflex has a faint fabric texture on one side, and a smooth glossy finish on the other side (which is the adhesive side). To get rid of WF's texture, most people (including me) just apply a few coats of Gesso. Just apply a coat, let it dry, sand it, and repeat. Each time you add a coat, you sand it with finer sandpaper until you get it as smooth as you want it to be. But make sure you shape it before putting on the gesso. I can't imagine what would happen if you applied the gesso first and _then_ started using the heatgun.

User avatar
lolita_otaku
Posts: 32
Joined: Thu Dec 15, 2005 9:22 am
Contact:

Post by lolita_otaku » Mon Mar 06, 2006 9:05 pm

Sterling wrote:Sounds promissing. Make sure to get lots of pictures of the process too.
Alright I will ^__^
After im done ill be glad to post pictures and tips so I can help others ( heh if everything works that is :roll: )

User avatar
lolita_otaku
Posts: 32
Joined: Thu Dec 15, 2005 9:22 am
Contact:

Post by lolita_otaku » Mon Mar 06, 2006 9:06 pm

Astillar wrote:Well, whether it's been heated or not, wonderflex has a faint fabric texture on one side, and a smooth glossy finish on the other side (which is the adhesive side). To get rid of WF's texture, most people (including me) just apply a few coats of Gesso. Just apply a coat, let it dry, sand it, and repeat. Each time you add a coat, you sand it with finer sandpaper until you get it as smooth as you want it to be. But make sure you shape it before putting on the gesso. I can't imagine what would happen if you applied the gesso first and _then_ started using the heatgun.
A horrible sticky hot toxic mess is what you would get lol!
gesso, ok *adds to list* Thanks!

User avatar
lolita_otaku
Posts: 32
Joined: Thu Dec 15, 2005 9:22 am
Contact:

Post by lolita_otaku » Tue Apr 18, 2006 8:35 pm

OK so im not sure if I can get any photos up, but i have finally goten some work done on this chest plate!
- I got plaster strips and a bucket of vasaline and had a ( very close X__x) friend of mine make the mold of my chest and upper torso
-after it hardened I cut it down a little bit and covered the inside with even more vasaline ( i wonder if the guy at the market thinks im some kinda freak for always coming in and buying out their supply..)
- i mixed and cast the liquid plaster into the nigitive mold this morning.

although im not 100% positive i mixed the casting plaster right, it seems to be working ok so far, I will post more in a few days if it all works out :D :D

User avatar
lolita_otaku
Posts: 32
Joined: Thu Dec 15, 2005 9:22 am
Contact:

Post by lolita_otaku » Tue Apr 18, 2006 8:36 pm

I am happy that I got some work done on this, I actually have spare time agian!

Post Reply